Uncategorized files
Jump to navigation
Jump to search
Showing below up to 50 results in range #8,251 to #8,300.
-
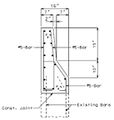
 751.40.4.1 non integral end bents existing slab.jpg 364 × 387; 23 KB
-
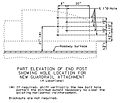
 751.40.4.1 non integral end bents proposed.jpg 365 × 384; 22 KB
-
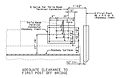
 751.40.4.1 non integral end bents proposed slab.jpg 496 × 418; 34 KB
-
 751.40.4.4.jpg 796 × 680; 74 KB
-
 751.40.4.4 clearance.jpg 859 × 558; 62 KB
-
 751.40.5.2 section.jpg 285 × 248; 20 KB
-
 751.40.5.2 typical.jpg 399 × 288; 27 KB
-
 751.40.8.5.1.1 slab cantilever.jpg 394 × 262; 21 KB
-
 751.40 Closure Pour - Part Section Thru Roadway.gif 418 × 137; 4 KB
-
 751.40 Conc Pile Cap Int Bents Beam Reinf (Special Case I).gif 665 × 304; 6 KB
-
 751.40 Conc Pile Cap Int Bents Beam Reinf (Special Case II).gif 650 × 307; 6 KB
-
-
-
-
-
-
-
-
-
-
 751.40 Conc Pile Cap Int Bents PS Dbl Tee (Section AA).gif 326 × 238; 7 KB
-
 751.40 Conc Pile Cap Int Bents PS Dbl Tee (Section BB).gif 340 × 244; 6 KB
-
-
 751.40 Conc Pile Cap Int Bents Reinf CIP Pile (Part Plan).gif 375 × 123; 3 KB
-
-
-
 751.40 Conc Pile Cap Int Bents Reinf Steel Pile (Part Plan).gif 418 × 151; 2 KB
-
-

-
 751.40 Conc Pile Cap Int Bents Sway Bracing (Steel & CIP Pile).gif 744 × 500; 25 KB
-
 751.40 Concrete Wearing Surface (Epoxy Polymer).gif 493 × 171; 6 KB
-
-
-
-

-
-
-

-
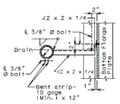
 751.40 Deadman Anchor Design Assumption Detail.gif 568 × 373; 14 KB
-
 751.40 Deadman Anchor Design Example Detail 1.gif 544 × 502; 13 KB
-
 751.40 Deadman Anchor Design Example Detail 2.gif 346 × 113; 2 KB
-
 751.40 Deadman Anchor Design Example Detail 3.gif 579 × 471; 24 KB
-
 751.40 Deadman Anchor Design Example Detail 4.gif 560 × 270; 8 KB
-
 751.40 Deck Repair (total surface hydro demolition).gif 744 × 500; 25 KB
-
-

-

-

-

-


.gif)
.gif)
.gif)
.gif)
.gif)
.gif)
.gif)
_(Section_AA).gif)
_(Section_BB).gif)
.gif)
.gif)
.gif)
.gif)
.gif)
.gif)
.gif)
.gif)
_Typ_Section_of_Flat_Plate_Exp_Device.gif)
.gif)
_Typ_Section_of_Flat_.gif)
_Typ_Section_of_Flat_Plate_Exp_Device.gif)
_no_1.gif)
_no_2.gif)


.gif)
(Hydro_demolition)_Full_Depth_Repair.gif)
(Hydro_demolition)_Full_Depth_Repair_in_Pa.gif)
(Hydro_demolition)_Full_Depth_Repair_in_Partial_Depth_Repair.gif)
(Hydro_demolition)_Partial_Depth_Repair.gif)
_Full_Depth_Repair.gif)
_Full_Depth_Repair_in_Half-Soled_Area.gif)
_Jt_Filler_Detail.gif)
_Jt_Filler_Detail.gif)
.gif)
.gif)
.gif)
_Typ_Section_of_Elastomeric_Exp_Device.gif)