Unused files
Jump to navigation
Jump to search
The following files exist but are not embedded in any page. Please note that other websites may link to a file with a direct URL, and so may still be listed here despite being in active use.
Showing below up to 50 results in range #8,651 to #8,700.
-
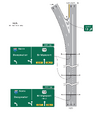
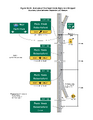
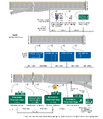 Figure 2E-2. Typical Sequence of Interchange Guide Signs.png 2,550 × 2,957; 345 KB
-
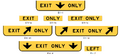 Figure 2E-17. EXIT ONLY and LEFT Sign Panels.png 702 × 326; 33 KB
-
 Figure 2E-2. Typical Sequence of Interchange Guide Signs v2.png 2,550 × 2,957; 345 KB
-
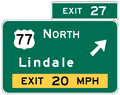
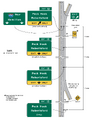
 Figure 2E-12. Examples of Exit Direction Signs.png 2,005 × 1,424; 129 KB
-
 Figure 2E-12. Examples of Exit Direction Signs v2.png 2,005 × 1,424; 129 KB
-
 Figure 2E-13. Exit Direction Sign Placement V2.png 2,230 × 1,977; 273 KB
-
 Figure 2E-18. Guide Signs for a Single-Lane Exit to the Left with a Dropped Lane.png 2,301 × 2,700; 244 KB
-
 Figure 2E-19. Guide Signs for a Single-Lane Exit to the Right with a Dropped Lane.png 2,075 × 2,475; 239 KB
-
-

-
 Figure 2E-22. Example of Guide Signs for an.png 2,199 × 2,865; 238 KB
-
 Figure 2E-23. Examples of Signing for Mainline Terminations.png 2,550 × 2,985; 410 KB
-

-
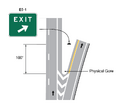
 Figure 2E-15. Exit Gore Signs and Plaques W13-1aP.png 520 × 176; 8 KB
-
 Figure 2E-16. Examples of Pull-Through Signs E6-1.png 237 × 272; 12 KB
-
 Figure 2E-16. Examples of Pull-Through Signs E6-1a.png 392 × 288; 20 KB
-
 Figure 903.5.26.png 1,522 × 1,021; 46 KB
-
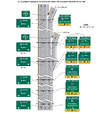
 Figure 2E-31. Example of Guide Signs for a Partial Cloverleaf Exit.png 2,090 × 2,290; 185 KB
-
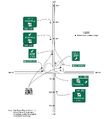 Figure 2E-31. Example of Guide Signs for a Partial Cloverleaf Exit.v2.png 2,090 × 2,290; 185 KB
-
 Figure 2E-50. Example of a Post-Exit Distance Sign E7-3.png 1,115 × 560; 35 KB
-
-
-
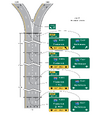 Figure 2E-34. Example of Guide Signs for a Split with Dedicated Lanes.png 2,550 × 3,042; 395 KB
-
 F02E-37.png 2,550 × 2,968; 219 KB
-
 F02E-37 v2.png 2,550 × 2,968; 219 KB
-
-
 Figure 2E-2. Typical Sequence of Interchange Guide Signs v3.png 2,550 × 3,300; 308 KB
-
 Figure 2E-2. Typical Sequence of Interchange Guide Signs v4.png 2,550 × 3,025; 347 KB
-
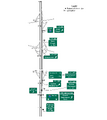
 Figure 2E-5. Example of Exit Numbering for Mainline v2.png 2,550 × 3,300; 330 KB
-
 Figure 2E-6. Example of Exit Numbering for V2.png 2,550 × 3,300; 237 KB
-
 Figure 2E-7. Example of Exit Numbering for v2.png 2,550 × 3,300; 196 KB
-
 Figure 2E-8. Example of Exit Numbering for Overlapping Routes v2.png 2,550 × 3,300; 162 KB
-
-
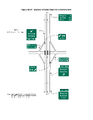 Figure 2E-27. Example of Guide Signs for a Diamond Exit v2.png 2,550 × 3,300; 183 KB
-
 F02E-NewFig v2.png 2,550 × 3,300; 69 KB
-
 F02E-NewFig v3.png 1,159 × 1,010; 45 KB
-
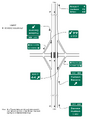 Figure 2E-27. Example of Guide Signs for a Diamond Exit v3.png 1,972 × 2,520; 338 KB
-
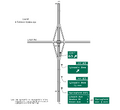 Figure 2E-28. Example of Guide Signs for a Diamond Exit in an Urban Area v2.png 2,550 × 2,344; 156 KB
-
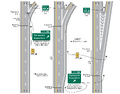 Figure 2E-13. Exit Direction Sign Placement V3.png 2,550 × 1,992; 278 KB
-
-
 Figure 2E-31. Example of Guide Signs for a Partial Cloverleaf Exit.v3.png 2,550 × 3,300; 178 KB
-
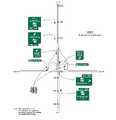 Figure 2E-31. Example of Guide Signs for a Partial Cloverleaf Exit.v4.png 2,278 × 2,351; 187 KB
-
 F09E-03-2.v.2.png 2,282 × 2,649; 100 KB
-
 Table2L-4.png 2,138 × 2,666; 99 KB
-
 D11-1.png 202 × 157; 15 KB
-
 D5-6c.png 800 × 267; 19 KB
-
 D12-2a.png 474 × 339; 2 KB
-
 D12-2b.png 426 × 304; 2 KB
-
 F09E-01.png 861 × 1,934; 44 KB
-
 F09E-02.png 2,550 × 3,300; 184 KB


.png)


.png)
_V2.png)


