Category:712 Structural Steel Construction
| Steel Girder Bridge, Testing, Load Rating |
| Report 1999 |
| See also: Research Publications |
| Approved Products |
| Qualified Protective Coatings for Machined Finished Surfaces |
712.1 Construction Inspection for Sec 712
The important feature of structural steel inspection includes such items as:
- (a) inspection of handling, unloading, storing, and erecting of the various members to make sure they are not subjected to excessive stress
- (b) erection with proper camber, adequately supported
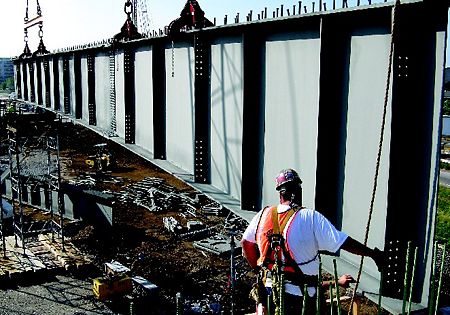
- (c) use of the required number of pins and erection bolts to hold all members rigidly in place
- (d) welding or bolting in such a manner that the designed stress and desired appearance is maintained. Any high strength bolts used as temporary erection bolts must be replaced with new permanent bolts.
Successful structural steel erection work will directly relate to skill of the workmen and thoroughness of the inspector. Welders must be qualified by passing required tests. Even though no tests are required for the bolting crew, the inspector has authority to insist that an experienced crew be used.
Fabrication Inspection Shipment Releases (FISRs) for structural steel and other metal products on structures such as decorative fences and similar steel fabrications are issued by the Bridge Division Fabrication Section inspector. These FISRs are issued by email to the fabricator and the Resident Engineer. The fabricator shall send these FISRs to the contractor. Refer to EPG 1080 Structural Steel Fabrication for more information regarding fabrication inspection shipment releases.
712.1.1 Expansion Joints
Expansion joints include all devices by which expansion due to temperature is dissipated within the joint instead of being transmitted to adjacent elements. Expansion joints will normally be provided for bridge superstructure steel, bridge decks and handrails. For this instruction, joints in floors and handrails will also be considered.
Prior to Setting Expansion Joints:
- Check vertical and horizontal dimensions.
- Check condition of joint upon delivery and provision for storage until installation.
- Check filler material for closed joints.
- Compute temperature correction.
During Construction:
- Set joints according to temperature correction.
- Align finger type joints exactly to ensure free movement without lateral contact.
- If compressible fill material is specified, joints to be filled must be clean and all paint or rust adhering to the structural steel must be removed to obtain necessary adhesion for a waterproof joint. Provide bottom support to prevent it from falling out of the joint, if loosened.
- Where the plans call for sealing of joints with hotpoured rubber-asphalt type compound, special care and equipment are required to obtain a satisfactory job. Heating of joint material must be done in a special double boiler kettle. Temperature of the material should be maintained at or very near that specified by the manufacturer. The joint must be dry and cleaned with air just ahead of the actual pouring operation. The joint should also be poured high to allow for settlement and contraction of joint material as it cools.
- If sleeve type joints are specified, as in handrails, set the inside element symmetrically with outside so that no localized friction will prevent free action of the sleeve.
- No material shall be allowed to enter the joint to prevent its free movement.
After Construction:
- After normal dead load has been taken by all elements of the structure, check freedom of movement.
- Check final position of joint against computed position for the current temperature.
- Remove any foreign material which may have entered the joint during construction.
712.1.2 Expansion And Contraction Computations
Expansion joints at ends of continuous units should be set carefully for elevation and opening, as well as checking the meshing of fingers in finger joints. Joint openings are given on bridge plans for a specified temperature, usually 60° F. Should the joint be set at a temperature other than specified, the opening must be adjusted. The coefficient of expansion of steel is 0.0000065 per degree F. Suppose for instance, that a joint opening is given as 1-1/8 in. at 60° F and the sum of the distances each side of the joint to the adjacent fixed shoes in the bridge is 165 ft. Assume temperature of the structural steel to be 95° F when this joint is set. The correction is found by multiplying the difference in degrees coefficient of expansion of steel; that is:
- (95° - 65°) x 165 ft. x 0.0000065 per degree
- = 35 x 165 x 0.0000065
- = 7/16 in.
Since the temperature when setting the joint was greater than 60° F, at which the joint was computed, the correction of 7/16 in. should be deducted if the joint is to give 1-1/8 in. opening at 60°. The opening at which the joint should be set at 95° would be 1-1/8 in. less 7/16 in. or 11/16 in. Likewise if the temperature at which the joint is set should be lower than that given on the plans, the correction should be added to the joint opening to give the required opening at plan temperature. Both sides of each joint should be set in place and checked for alignment and fit before any permanent connections are made to either side to ensure: (1) smooth riding surface, (2) proper depth of concrete slab, and (3) a joint which will operate correctly with expansion and contraction movements of the bridge.
For bearing devices, specified temperatures will be used as the basic temperature on which to base an allowance for expansion or contraction. Rockers and rollers should be vertical and masonry plates in a neutral position for full dead load at this specified temperature. The masonry plates shall be placed in this position for all degrees of temperature but the rockers shall be tipped in the proper direction and the rollers placed in the required position to compensate for the amount of expansion or contraction of steel at the time they are placed.
712.1.3 Bearings
Bearings are devices for transferring superstructure loads to bridge seats. They include masonry bearing plates, elastomeric pads, shoes, rockers, rollers, and combinations of them some of which may be teflon coated. Anchors are the means of preventing movement of bearing devices on bridge seats and include anchor bolts, bars, or structural shapes. Earthquake retainers are provided on some bridges to prevent the bearing devices from moving off the bearing area.
Prior to setting of Bearings or Anchorage:
- Check vertical and horizontal dimensions.
- Check condition of bearing upon delivery and provisions for storage until installation.
- Inspect bridge seats to ensure that they are finished to receive bearings.
- If anchorages have been cast in place during construction of bridge seat, check for accuracy.
- Compute temperature correction.
During Construction:
- Anchor bolt wells which are formed will be detailed on the bridge plans typically. Holes for anchor bolts may be drilled as a contractor option and will be noted on the plans typically. Either wells or holes must be kept free of water in freezing weather.
- Position of anchor bolts with respect to expansion bearing details shall correspond with the position indicated for the temperature at time of erection.
- Formed wells or drilled or formed holes will be backfilled after anchors are set with non-shrink grout completely filling the space in the hole.
- Correct any irregularities in bearing plate areas of bridge seat.
- Set bearing plates in exact position with full uniform bearing on contact surface.
- Unless otherwise specified, contact surfaces shall be painted in accordance with the specifications. Compressed rubber and fabric pads shall be placed under the bearing plates as shown on the plans.
- Rocker or roller, if used, shall be set in the position dictated by temperatures at time of setting.
- Where expansion bearings include sliding plates of different coefficients of friction, care must be taken not to reverse the position of the two plates with respect to each other and to the bridge seat.
712.1.4 Welding
712.1.4.1 Field Welding
712.1.4.1.1 Field Welder Cards
Specifications require that field welders shall be certified by an established facility with an accredited American Welding Society (AWS) certification program defined in the current AWS Standard QC4. Welders shall be certified per the current QC7 Standard for AWS Certified Welders. The code of acceptance shall be in accordance with Sec 1080.3.3.4 Applicable Codes. Welders who have successfully completed the certification program will be issued an AWS Welder Card. AWS also has an agreement with the Ironworkers Union that allows them to be accredited test facilities for Ironworkers Union members that meet the same requirements of QC4 and QC7. A copy of the AWS Welder card and the Ironworkers Union card are shown:
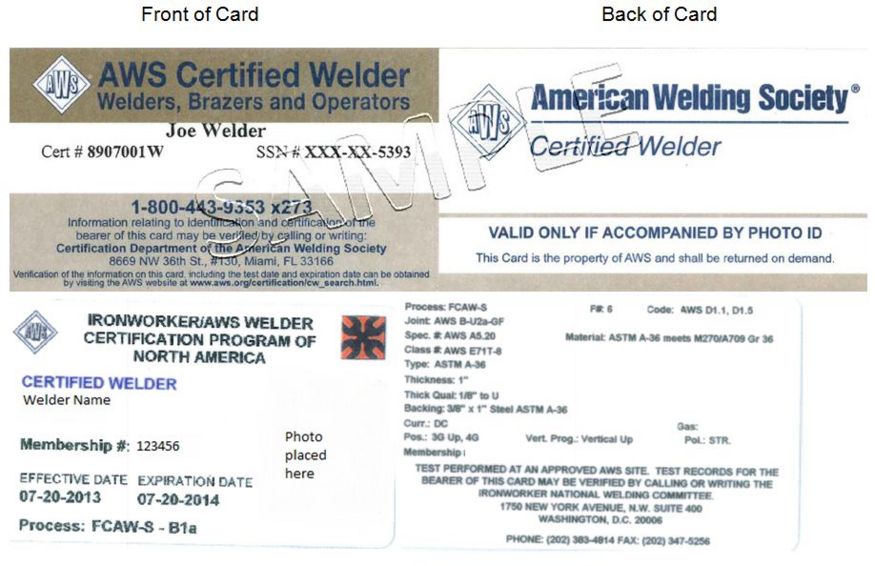
The AWS website has a link that provides guidance on interpreting the information that is shown on the back of the cards furnished by both AWS and the Ironworkers Union. A link to the AWS website that provides both locations of accredited test facilities (ATF) and interpretation of the welder card information is available.
AWS certification shall be considered in effect indefinitely provided that the welder remains active in the process that they are qualified for without an interruption greater than six months and there is no specific reason to question the welder’s ability to produce quality welds. Certification maintenance is the responsibility of the welder and shall be presented to the engineer upon request. The welder shall present a copy of their AWS or Ironworkers Union card to the engineer prior to welding. Welders that have tested within six months of welding on a project may have a temporary certification letter provided by the test facility that may be used while the card is being produced. Certification maintenance shall be in accordance with AWS QC7 and the supplement QC7G. Questions regarding the validity of temporary cards may be directed to the Construction and Materials Division.
If the engineer has reason to question the ability of the welder, a retest should be requested. Retests shall be conducted by an AWS accredited test facility.
712.1.4.1.2 Field Welding Minimum Certifications
For inspection purposes some of the specific types of work and the minimum required position certification are as shown in the following table:
| Type of Work | Required Position Certification |
|---|---|
| Steel Pile Splices (HP & Shell Piles) | 2G |
| Steel Pile Points (HP & Shell Piles) | 2G |
| Stay-in-Place Form Support Angles | None |
| Girder/Beam Flanges to Bearing Plates | 2G |
| Stiffeners | 3G |
| Anything else not listed | 3G unless otherwise specified by the Engineer. |
A welder qualified for one position also qualifies for performing other welds as shown in the following table:
| Certified Position | Qualified to Perform |
|---|---|
| 1G | 1F, 2F, 1G |
| 2G | 1F, 2F, 1G, 2G |
| 3G | 1F, 2F, 3F, 1G, 2G, 3G |
| 4G | 1F, 2F, 4F, 1G, 4G |
| 3G & 4G | All Groove and Fillet Positions |
| 1F | 1F |
| 2F | 1F, 2F |
| 3F | 1F, 2F, 3F |
| 4F | 1F, 2F, 4F |
| 3F & 4F | All Fillet Positions |
| KEY: 1=flat, 2=horizontal, 3=vertical, 4=overhead, G=groove, F=fillet | |
Examples of the weld positions for groove welds and fillet welds are as follows:
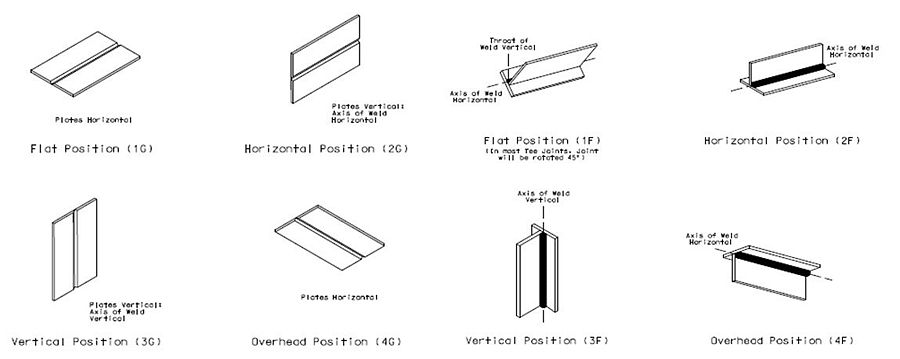
In most cases, a welder may elect to take one of two test plate thicknesses. A limited thickness test will be taken on a 3/8 in. test plate. This will qualify a welder for groove welds of a maximum plate thickness of 3/4 in. and fillet welds on plates of unlimited thickness. An unlimited thickness test will be taken on a 1 in. thick plate and qualifies the welder for unlimited plate thickness for both groove welds and fillet welds. The welder’s card that is to be presented at the job site will show both the test plate thickness as well as the plate thickness limitations.
712.1.4.1.3 Shear Connector Welding
Current practices by the contractor may utilize the installation of shear connectors by field personnel. Most shear connector welding is completed by an automated welding process. AWS does not have a qualification procedure established in QC7. Instead, welders shall be qualified in accordance with 2002 AWS Bridge Welding Code D1.5 Clause 7.7 by MoDOT field personnel. Shear connector welders shall be qualified by conducting a preproduction test. This test involves the welder welding two shear connectors to a test plate or to the production plate. The test specimens shall be visually inspected to ensure a full 360° weld. After the welds have cooled, the shear connectors shall then be bent to an angle of approximately 30° from the original axis by either striking with a hammer or placing a pipe over the shear connector and then bending. If the shear connector does not exhibit a complete weld or a failure occurs in the weld of either shear connector, the welder shall adjust the automatic welding machine and retest on a separate weld test plate. The welder may not retest on the actual production plate.
Before shear connector production welding in the field begins with a particular welder set-up, a specific shear connector size or type, and at the beginning of production for a particular shift or day, a preproduction test shall be conducted. The preproduction test shall be conducted on the first two shear connectors welded to the production plate or may be conducted on a separate test plate of the same thickness (+/- 25%). The acceptance method is the same as given earlier for the welder test.
Once shear connector production welding has commenced, any welds that do not exhibit the full 360° weld may be repaired using a 5/16 in. fillet weld for shear connector diameters up to one inch and 3/8 in. for diameters greater than one inch. The repair weld shall extend 3/8 in. beyond the end of the area to be repaired.
Additional verification of shear connector welds in the field will be performed by sounding a random 25% of the shear connectors on the girder/beam with a sledge hammer. The field inspector will also sound 25 percent of the shear connectors used on expansion device(s) whether shop or field installed. A sharp ping sound is heard on a good weld. A thud sound will occur if the weld is possibly not sufficient and a bent test needs to be performed on this shear connector. A random 5% of all shear connectors will be bent to an approximately 30° from the original axes to verify the integrity and welding of the shear connector. If a failed weld is discovered, all adjacent connectors shall be tested. Particular emphasis on testing shall be at the start-up of the welding operation. Once an acceptable welding process is established, any weld failures should be rare. For a large bridge with many shear connectors, the 5% testing rate may be decreased at the engineer’s discretion. Any failed welds shall be ground off, base metal pull outs repaired by approved weld procedures, weld surface ground flush and a replacement shear stud installed.
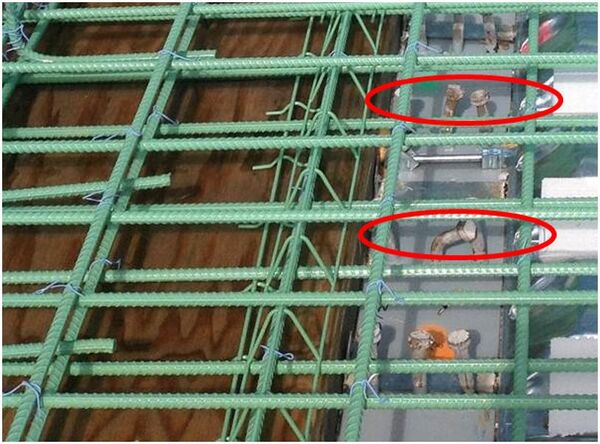
On a re-deck project, some shear connectors may be bent from the deck removal or from the original construction testing. These shear connectors do not have to be replaced or straightened. Shear connectors on new or re-deck projects may also need to be field bent to accommodate expansion joints, rebar conflicts or other construction needs. If a shear connector is severely bent where concrete coverage is compromised, the shear connector shall be removed and replaced.
712.1.4.1.4 Acceptable Field Welding Processes
All field welding using flux cored arc welding (FCAW) shall require welding procedures be submitted to the Bridge Division (Fabrication@modot.mo.gov) for acceptance prior to any welding on any bridge. All field welding using shielded metal arc welding (SMAW or commonly known as stick welding) shall require welding procedures be submitted to Bridge Division (Fabrication@modot.mo.gov) for acceptance prior to any welding on major bridges (total length ≥ 1000 feet), bridges with structural steel with fy ≥ 70,000 psi (fs ≥ 38,000 psi), truss bridges, bridges with 2 girder systems and bridges containing fracture critical members (FCM). All other locations with SMAW, the contractor shall have field welding procedures on file prior to welding and available at the engineer’s request.
MoDOT permits only two specific welding processes for field welding on steel bridges. These processes are SMAW and FCAW. The preferred method for field welding is SMAW. SMAW on structural steel (fy < 69,000 psi, fs < 37,000 psi) that will be coated are to be welded with E7018, low hydrogen electrodes. SMAW on uncoated (weathering) structural steel (fy < 69,000 psi, fs < 37,000 psi) are to be welded with E8018, low hydrogen weathering steel electrodes. Welding on structural steel with fy ≥ 70,000 psi (fs ≥ 38,000 psi) and fracture critical members (FCM) are to be determined by weld procedures which shall be submitted to the Bridge Division (Fabrication@modot.mo.gov). FCAW always require welding procedures be submitted to Bridge Division since the welding code requires procedure qualification record (PQR) for the welding procedures. FCAW on structural steel is preferred to be completed with a self-shielded process where no shielding gas is used. This will be noted on the welder’s card as FCAW-S. Gas shielding for FCAW is discouraged due to the additional requirements to provide protection of the weld area from gas dispersion caused by the wind but FCAW can be used provided the weld area is shielded properly from wind.
Welding of aluminum products in the field may be completed using gas metal arc welding (GMAW or commonly known as MIG welding) or with SMAW with special aluminum electrodes. Like FCAW welding using gas shielding, the weld area must be protected to prevent shielding gas dispersion when welding with GMAW. GMAW is the preferred method of welding aluminum by AWS. However, SMAW may be used provided that special care is taken during welding to control the welding parameters and that all welding slag is removed.
712.1.4.2 Shop Welding
Fabrication shops shall qualify welders in accordance with the governing welding code for the specific process as required in Sec 1080.3.3.4. It is the responsibility of the fabrication shop’s quality control personnel to ensure that the welder’s test documentation and period of effectiveness are documented and maintained.
712.1.5 High Strength Bolts (Sec 712.7)
Bolts, nuts, and washers must meet applicable requirements of AASHTO as noted in Sec 1080.2. ASTM F3125 Grade A325 bolts shall be used on bridge connections unless other types of bolts are specified in the contract. To facilitate easy identification of high strength bolts, the following figure shows some of the typical bolt markings required by the ASTM specification.
- (Reprinted and modified from AISC Steel Construction Manual, 15th Ed., Table 2.1 and Figure C-2.1).
- Note: XYZ represents the manufacturer’s identification mark.
A permissible alternate type of nut may be furnished. Such nuts would be marked with the symbol 2 or 2H and the manufacturer's symbol.
Bolts tightened by the calibrated wrench or turn-of-nut method should be checked following the procedures outlined in the Standard Specifications.
The sides of bolt heads and nuts tightened with an impact wrench will appear slightly peened. This will indicate that the wrench has been applied to the fastener.
712.1.5.1 Bolted Parts
Sec 712.7.1 covers cleaning of parts to be bolted. Bolts, nuts, and washers will normally be received with a light residual coating of lubricant. This coating is not considered detrimental to friction type connections and need not be removed. If bolts are received with a heavy coating of preservative, it must be removed. A light residual coating of lubricant may be applied or allowed to remain in the bolt threads, but not to such an extent as to run down between the washer and bolted parts and into the interfaces between parts being assembled.
712.1.5.2 Bolt Tension
A washer is required under nut or bolt head, whichever is turned in tightening, to prevent galling between nut or bolt head and the surface against which the head or nut would turn in tightening, and to minimize irregularities in the torque-tension ratio where bolts are tightened by calibrated wrench method. Washers are also required under finished nuts and the heads of regular semi-finished hexagon bolts against the possibility of some reduction in bearing area due to field reaming. When oversized holes are used as permitted by the contract, a washer shall be placed under both the bolt head and the nut.
Standard Specifications require that bolt torque and impact wrenches be calibrated by means of a device capable of measuring actual tension produced by a given wrench effort applied to a representative sample. Current specifications require power wrenches to be set to induce a bolt tension 5 percent to 10 percent in excess of specified values but the Special Provisions for the project should be checked for a possible revision to this requirement.
The contractor is required to furnish a device capable of indicating actual bolt tension for the calibration of wrenches or load indicating device. A certification indicating recent calibration of the device should accompany it. It is recommended that the certification of calibration be within the past year but if the device is being used with satisfactory results, the period may be extended. More frequent calibration may be necessary if the device receives heavy use over an extended period.
The contractor will generally use either the calibrated wrench method or the turn-of-nut method for tightening bolts as outlined in Sec 712.7. The sides of bolt heads or nuts tightened with an impact wrench will appear slightly peened. This will usually indicate that the wrench has been applied to the fastener. If the wrench damages the galvanized coating, the contractor shall repair the coating by an acceptable method.
712.1.5.3 Rotational-Capacity Testing and Installation of ASTM F3125 Grade A325 Type 3 Bolts
Type 3 (weathering steel) bolts behave quite differently than the galvanized bolts used in most MoDOT structures and require additional care to test and install properly.
The contractor must keep bolts stored in sealed kegs out of the elements until ready for use. Storage in a warehouse, shed, shipping container or other weatherproof building is best. The lubricant used on Type 3 bolts dissipates quickly, allowing rust to begin. Kegs should not be opened until absolutely necessary and promptly resealed whenever work stops.
If bolts fail the rotational-capacity test, insufficient lubrication is the most likely cause. Relubrication of Grade A325 bolts is allowed. Several different waxes and lubricants are suggested by FHWA, including Castrol 140 Stick Wax (which has been successfully field tested by MoDOT), Castrol Safety-Film 639, MacDermid Torque’N Tension Control Fluid, beeswax, etc.
Galling of the washer may occur, especially with longer bolts. This can be reduced by lubricating the contact area of the bolt face at the washer with an approved lubricant. If this face is lubricated for testing, it must also be lubricated during bolt installation.
Failure of the bolts due to galling of the washer can also be prevented by turning the nut in one continuous motion during testing. For larger diameter bolts, this can be a problem. Torque multipliers amplify this effect. If many larger diameter bolts will be tested, ask the contractor to purchase an electric gear reduction wrench with reaction arm. The Skidmore will need to have a reaction kit installed. This wrench will produce better results and save time spent performing tests (and, therefore, lower costs).
For long bolts, (L>8d), use proper spacer bushings on the back of the Skidmore to avoid excessive use of spacers between the washer and front plate of the Skidmore. Stacking spacers can cause bending of long bolts, which will cause inaccurate results, false failures and potential damage to the Skidmore. Consult the Skidmore user manual for maximum allowable spacer lengths.
712.1.5.4 Bolt Testing and Verification
Bridges are designed so that many of the steel-to-steel connections that are made in the field are slip-critical connections. Slip-critical means that once the bolt is tightened, the bolt and the pieces of steel (or plies) will not move. It relies on the bolt to clamp down on the steel and create so much force between the steel plates that they will not move at all. Should they slip and move it would be a critical issue for the bridge.
When it comes to bolt design, the bolt is being tensioned in order to establish the clamping force needed. The tightening of the nut on the bolt is what produces the needed tension. Bridge Designers will design each of these joints based on established minimums for each bolt size. So, for example, a Bridge Designer will assume that an ASTM F3125 Grade A325 7/8” diameter bolt will be able to supply 39,000 pounds of clamping force. This means that the contractor in the field must ensure that they are tightening each bolt to this tension.
In order to verify that the bolts are installed correctly in the field, it is essential that contractors and inspectors understand the requirements of bolted connections, and the specifications that govern them. For this work, Sec 712 Structural Steel Connection and Sec 1080 Structural Steel Fabrication will primarily be consulted.
The general steps are:
712.1.5.4.1 Step 1, Determine Bolt Type
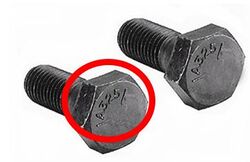
The first step is to review the contractor’s submittals to see what kind of bolts they will be using. You can also look at the bolts in the field to check for the bolt type. Table 712.1.5.4.1 shows what is on the hex head of the bolt, and how the markings can show what type of bolt it is.
| Bolt/Nut | Type 1 (Plain or Galvanized) | Type 3 (Weathering) | ||
|---|---|---|---|---|
| ASTM F3125 Grade A325 |  Three radial lines 120° Apart are optional |

| ||
| ASTM F3125 Grade A490 |  |

| ||
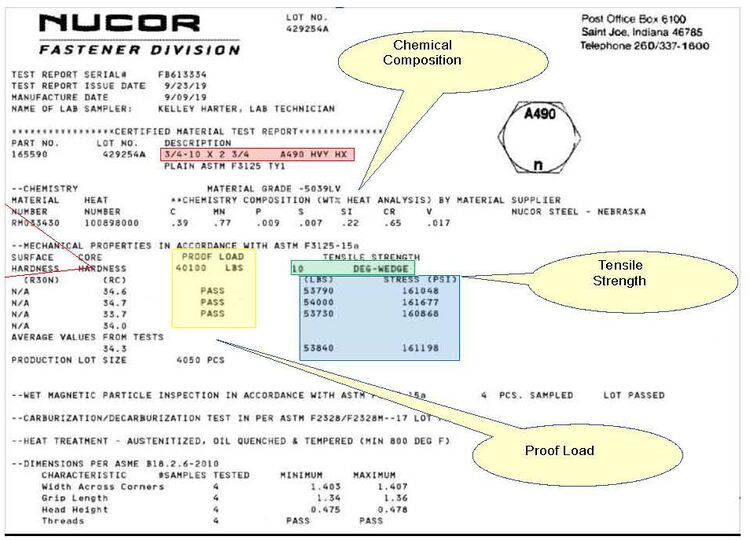
Below is a section from ASTM F3125 that governs the testing requirements for these types of high-strength bolts. The text shown is a portion of the test method that deals with lot control. It is an expectation of the standard that not only are all high-strength bolts produced meeting the material properties specified, but the manufacturer also must produce these bolts with a specific tracking procedure that reduces groups of bolts into lots. The lots are a set of bolts that are represented by material tests to prove they meet requirements. Each of these sets of bolts are tracked with paperwork and lot identification numbers. Not only are the bolts produced this way, but also all the nuts and washers have specific lots assigned. When a bolt, nut, and washer are put together and sold together, they are referred to as an assembly. Once one piece of the assembly changes, the properties of the bolt could potentially have been changed.

Figure 712.1.5.4.1.1 and 712.1.5.4.1.2 below are of bolt heads to show different types and Figure 712.1.5.4.1.3 shows a copy of common shipping form that provides testing verification of the bolts.
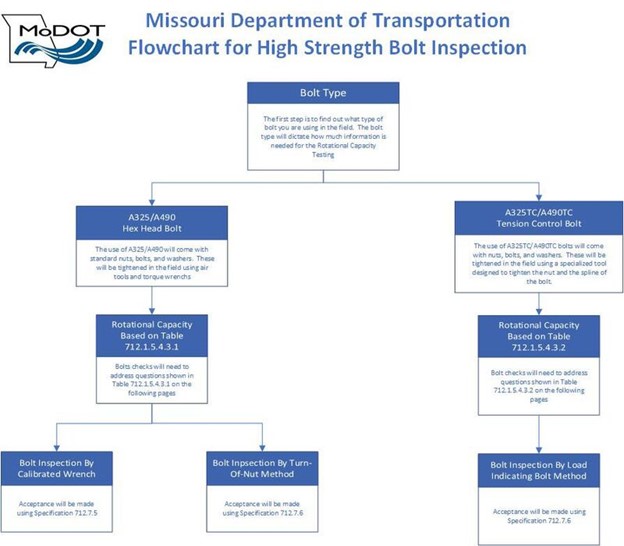
712.1.5.4.2 Step 2, Inspection Type Selection
The second step is to determine the inspection type. The flowchart below gives information on how to proceed once it is determined what type of bolt is being used in the field. The bolt type and verification method available will dictate the options and the requirements needed to follow for inspection in the field.
Prior to going into the field, determine the bolt type and the inspection method that will be used. This will allow you to know the equipment needed and discuss test procedures with the contractor. For some test methods, the contractor will provide the calibrated equipment to check the bolts.
712.1.5.4.3 Step 3, Rotational Capacity
The third step is to verify that the bolts on the jobsite are going to perform as intended by the design team. Each of these bolts must achieve a specific tension that will be confirmed using the Rotational Capacity Testing. This test is described in Sec 712.7 and Sec 1080.2.5.4.
The goal of the Rotational Capacity test is to verify that the bolts will perform as intended. The main component that is being tested is that the bolts can be brought to the correct tension. This must be accomplished without applying too much torque to the bolts and field installed bolts will be turned to the correct rotation meeting or exceeding the design tension for the fastener. For the bolts to work correctly, it is critical for the threads to be clean and there must be plenty of lubricant on the bolts and nuts. There is a chance that the protective coatings and lubricants will be washed away anytime the bolts, nuts, and washers are allowed to sit out in the elements. In addition, there is a chance that rust could develop from water being on the bolts, and carelessness could lead to physical damage of the bolts. Any of these issues could cause the bolts and the nuts to not interact as designed. It may take more torque to achieve the needed tension in the bolts or the installed fasteners cannot be checked accordingly with a torque wrench.
The bolt manufacturer may provide documentation to show that a Rotational Capacity Test (RoCap) has been performed. The inspector and contractor will still have to perform Rotational Capacity Tests in the field even if this paperwork is provided. According to Sec 712.7.10, “rotational capacity test shall be performed on 3 bolts of each rotational-capacity lot prior to the start of bolt installation.” All bolt assemblies provided shall be a part of a rotational capacity lot, which means that all bolt assembly lots used on MoDOT jobs shall be tested on the jobsite prior to incorporation. The first time a new lot of bolts is opened, plan on performing the test. Also, the Rotation Capacity Test should be run any time questions or issues arise when torqueing a bolt to achieve design tension, or bolt hardware conditions change.
The RoCap test should only be run once per lot, unless one of the following conditions occur:
- 1. Bolts arrive on the jobsite for the first time
- All bolt assembly lots must be tested once they are on the jobsite. If conditions do not change, then the one test should suffice.
- 2. Bolt, washer, or nut lots have been interchanged
- It is important when the Rotational Capacity test is run that lot numbers for all the individual pieces (bolts, nuts, and washers) remain the same. Once any of these lots change, the Rotational Capacity test must be run again.
- 3. Bolt lubrication appears to have been compromised
- Once a Rotation Capacity test has been run, another one will not have to be run, unless the bolt condition changes. One aspect that is a factor is bolt lubrication. If the bolt is left in the wind and rain, the lubrication likely will be compromised. Once it is noticed that a bolt lubrication has changed, the Rotation Capacity test must be run again.
- 4. Bolts appear rusty or damaged
- Rust is the far extreme of a lack of lubrication. Not only has the lubrication gone away, but the protective coating is gone, and the bolt has been allowed to rust. They will need to be cleaned, re-lubricated and tested again for Rotation Capacity.
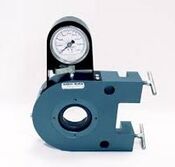
There is not a way to test tension once the bolt has been tightened. The Rotational Capacity Test is a way to verify not only that the bolts are in good condition, but also that they have not been impacted by field conditions. The test will require two components. One component is to visually inspect the bolts and record the results on the form provided in eProjects. The second component is to run tests on the three bolts in the field using a Skidmore-Wilhelm Bolt tension measuring device and a torque wrench. Both the Skidmore and torque wrench must have a calibration performed on it within the previous year from the manufacturer or a test lab. There must be a sticker on it, as well as all supporting documentation to show it has been calibrated.
RoCap Test Form Long Bolts are shown in Table 712.1.5.4.3.1 and Table 712.1.5.4.3.3, RoCap Test Form Short Bolts are shown in Table 712.1.5.4.3.2. These forms will assist in obtaining all the required information for the testing methods allowed by MoDOT.
Table 712.1.5.4.3.1 and Table 712.1.5.4.3.2 is to be used when the Calibrated Wrench (Sec 712.7.5) or Turn-Of-Nut (Sec 712.7.6) Methods are used. By running the calculations in the spec book to verify the bolts, the values needed for the equipment in the field will also be determined. The entire test will need to be completed to verify that the bolt is good for use in the field.
- Calibrated Wrench – The values from Table 712.1.5.4.3.1 and Table 712.1.5.4.3.2 that will be needed are the recorded Torque Values.
- Turn-Of-Nut – When using the Turn-Of-Nut Method, the Rotation Capacity Test provides a check that the turn requirements of Sec 712.7.6 will generate the minimum tension required. Verify that the amount the nut has turned going to the minimum bolt tension is less than the specified nut rotation in Sec 712.7.6 Nut Rotation from Snug Tight Condition table.
The RoCap test for Calibrated Wrench and Turn-Of-Nut Methods is split based on long and short bolts. Long bolts are those bolts that can fit into the Skidmore-Wilhelm Bolt Tension Measuring Device or the Skidmore-Wilhelm short bolt setup. Short bolts are those that are too short to fit into the short bolt setup tension measuring device.
Table 712.1.5.4.3.1 provides info about how to run the test, and the information to be recorded.
| Rotation Capacity Testing Steps for Calibrated Wrench Method (Sec 712.7.5) and
Turn-Of_Nut Method (Sec 712.7.6) | |||||||||||
|---|---|---|---|---|---|---|---|---|---|---|---|
| Table 712.1.5.4.3.1
Job Site Rotational Capacity Test (RoCap Test) – A325 & A490 Long Bolts | |||||||||||
Test No. |
Part 1 | Part 2 | |||||||||
| Sec 712.7.3 Minimum Bolt Tension (P) | Less Than |
Bolt Tension Gauge Reading (P) | Sec 1080.2.5.4.6 Maximum Allowable Torque (T) | Greater Than |
Torque Gauge Reading | Actual Nut Rotation (turn) | Sec 721.7.6 Nut Rotation (turn) Less than actual(Y/N) | Sec 1080.2.5.4 Required Rotation (turn) Tension Gauge Reading | Equal or Greater Than |
Sec 1080.2.5.4.5 Required Turn Test Tension | |
| 1 | < | > | >= | ||||||||
| 2 | < | > | >= | ||||||||
| 3 | < | > | >= | ||||||||
| R1 | < | > | >= | ||||||||
| R2 | < | > | >= | ||||||||
| R3 | < | > | >= | ||||||||
| Torque Formula (T=0.25P x Dia./12), T in ft-lbs, P in lbs, Bolt Dia. in inches | |||||||||||
Long Bolt Test
- 1. Measure the ratio of diameter/length of the bolt.
- 2. Place the bolt into the Skidmore and set it to snug tight (10% of installation tension in Sec 712.7.3 Bolt Tension Table). This is to be done with a spud wrench. The contractor should add washers until three to five threads are in the grip, if less than 3 threads, the test will fail. Mark reference rotation marks on the fastener assembly element turned and on face plate of Skidmore. (Mark starting point on bolt end, nut and calibrator face with straight line.) Note that some short bolts may require the shortbolt setup for the Skidmore.
- 3. Turn the fastener with the wrench to be used for the daily testing in the field to the installation minimum tension in Sec 712.7.3 Bolt Tension Table. Stop and record the torque at that moment from the torque wrench and record the tension on the Skidmore. Verify the recorded torque does not exceed the maximum allowable torque (refer to Sec 1080.2.5.4.6 formula). Verify that the amount the nut has turned going to the minimum bolt tension is less than the specified nut rotation in Sec 712.7.6 Nut Rotation from Snug Tight Condition table.
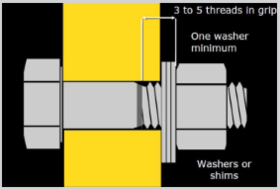
- 4. Further turn the bolt according to Sec 1080.2.5.4.4. This rotation is measured from the initial match mark made in step 2. . Record the tension achieved and then compare the tension at this point to the Turn Test Tension in Sec 1080.2.5.4.5 Required Bolt Tensions Table. The tension must be equal or greater than Turn Test Tension.
- 5. Remove the bolt and inspect for damage and record it on our form. Turn the nut by hand on the bolt threads to the position it was in during the test. Not being able to turn the nut by hand is thread failure.
- 6. Repeat the process 2 additional times for each type of bolt assembly (Total of 3 tests per assembly lot).
- 7. Once the 3 tension and torque values have been obtained from Step 3, use the higher of the 3 numbers.
Table 712.1.5.4.3.2 provides info about how to run the short bolt test for those bolts that are too short to fit into the Skidmore-Wilhelm short bolt setup tension measuring device and the information to be recorded.
| Rotation Capacity Testing Steps for Calibrated Wrench Method (Sec 712.7.5) and
Turn-Of_Nut Method (Sec 712.7.6) | ||||||
|---|---|---|---|---|---|---|
| Table 712.1.5.4.3.2
Job Site Rotational Capacity Test (RoCap Test) – A325 & A490 Short Bolts | ||||||
| Test No. | Sec 1080.2.5.4.5 Turn Test Tension (P) | 20% of Max. Turn Test Torque (T) | Maximum Calculated Turn Test Torque | Greater Than | Torque Gauge Reading at End of First Rotation | Visual Inspection of nut and bolt after Second Rotation (Acceptable/Not Acceptable) |
| 1 | > | |||||
| 2 | > | |||||
| 3 | > | |||||
| R1 | > | |||||
| R2 | > | |||||
| R3 | > | |||||
| 20% Torque Formula (T = 0.20P x Dia./12), T in ft-lbs., P in lbs., Bolt Dia. in inches | ||||||
| Torque Formula (T=0.25P x Dia./12), T in ft-lbs., P in lbs., Bolt Dia. in inches | ||||||
| First Rotation | [L<= 4D, 1/3 turn (120°)], [4D< L<8D, 1/2 turn (180°)] | |||||
| Second Rotation | A325 [L<= 4D, 1/3 turn (120°)], [4D< L<8D, 1/2 turn (180°)]
A490 [L<= 4D, 1/4 turn (90°)], [4D< L<8D, 1/3 turn (120°)] | |||||
Short Bolt Test
- 1. Measure the ratio of diameter/length of the bolt and refer to Sec 712.7.6 on the installation rotation.
- 2. Place the bolt into the steel plate. The contractor should add washers until three to five threads are in the grip, if less than 3 threads the test will fail. Set it to snug tight (Not exceed 20% of maximum torque at first rotation). Maximum torque at first rotation is equal to Turn Test Tension, Sec 1080.2.5.4.5 and applying that tension to the torque formula in Sec 1080.2.5.4.6. This is to be done with a measuring torque wrench.

- 3. Mark reference rotation marks on the fastener assembly element turned and on face of steel plate. (Mark starting point on bolt end, nut and steel plate face with straight line.)
- 4. Turn the fastener with the torque wrench to be used for the daily testing in the field to the rotation shown in Sec 712.7.6 Nut Rotation from Snug Tight Condition Table. Once the first target rotation has been reached, stop and record the torque at that moment from the torque wrench. Verify the recorded torque does not exceed the maximum torque. Maximum torque at first rotation is turn test tension, Sec 1080.2.5.4.5 with torque formula Sec 1080.2.5.4.6, as shown in step 2.
- 5. Further turn the bolt further according to Sec 1080.2.5.4.4. This rotation is measured from the initial match mark made in step 3. Assemblies that strip or fracture prior to this rotation fail the test.
- 6. Remove the bolt and inspect for damage and record it on our form. Turn the nut by hand on the bolt threads to the position it was in during the test. Not being able to turn the nut by hand is thread failure.
- 7. Repeat the process 2 additional times for each type of bolt assembly (Total of 3 tests per assembly lot).
- 8. Once the 3 torque values have been obtained from Step 3, use the higher of the 3 torque numbers.
Rotation Capacity Testing Steps For Load Indicating Bolt Method (Sec 712.7.7)
The Load Indicating Bolt Method is less common. The bolt is designed to automatically verify that the bolts are not overtightened. The Rotational Capacity test in the field is to verify that the threads are not binding due to rust and dirt. This binding will give a false reading and cause the bolt spline to shear off prior to the design tension being achieved. Also due to the consistency of the bolt, there will not be a need to tighten the bolt to 1.15 times the Minimum Target Tension. The spline of the bolts will snap off within 5-10% of the designed tension of the fastener and exceed the Minimum Target Tension when properly lubricated.
Table 712.1.5.4.3.3 provides info about how to run the test, and the information to be recorded.
| Table 712.1.5.4.3.3
Rotation Capacity Testing Steps for Load Indicating Bolt Method (Section 712.7.7) | ||||
|---|---|---|---|---|
| Job Site Rotational Capacity Test A325/A490 Bolts | ||||
| Test No. | Sec 712.7.3 1.05xMinimum Bolt Tension (P) | Less Than | Bolt Tension Gauge Reading (P) | Inspection Torque Calculated Value |
| 1 | < | |||
| 2 | < | |||
| 3 | < | |||
| R1 | < | |||
| R2 | < | |||
| R3 | < | |||
| (Inspection Torque formula = 0.95 x Gauged Tension Reading x Bolt Dia. / 12; Bolt Dia. in inches) | ||||
- 1. Measure the ratio of diameter/length of the bolt.
- 2. Place the bolt into the Skidmore and set it to snug tight (10% of installation tension). This is to be done with a spud wrench. The contractor should add washers until only three threads are showing.
- 3. Place the specialty tool used on the end of the bolt and tighten until the spline of the bolt snaps off.
- 4. Record the tension value on the Skidmore once the bolt has snapped.
- 5. Verify that the recorded value is greater than 1.05 times the Minimum Target Tension from Sec 712.7.3.
- 6. Remove the bolt and inspect for damage.
- 7. Repeat the process 2 additional times for each type of bolt assembly (Total of 3 tests per assembly lot).
It is most important to verify plies were in contact when bolts were snugged and that a fastener was not subsequently loosened when accompanying splice bolts were tightened and compacted the splice faying surfaces into contact after other fasteners had been already tightened.
712.1.5.4.4 Step 4, Installation
The next step is to ensure the proper process is used in the assembly of structural steel. It is important that the contractor is placing temporary bolts, drift pins and permanent bolts in the correct pattern. Read Sec 712.5 for additional requirements when fitting-up the structural steel.
The order in which bolts are tightened is important. If not done correctly, the plates will not be sandwiched tightly, and gaps will be introduced. Due to these being slip-critical connections, the joints need to experience 100% contact between all the plies. The contractor will need to start tightening the joints in the center of the plate, and then work radially out from the center to the extents of the joint.
Once the bolts are tightened by the contractor using one of the three approved methods, MoDOT will be responsible to check a portion of the bolts. We will review 10% of the bolts, or two per lot, whichever is greater. If bolt issues are discovered, more bolts may need to be reviewed. The following steps are generally what is seen in the field. There may be differences per contractor, but MoDOT's roles and requirements should be the same across the state.
- Contractor/QC: The contractor will be installing the bolts through various methods. It can be expected to see Turn-Of-Nut Method or Calibrated Wrench (Torque Wrench). You could also see the contractor using Stall Out guns that are designed to stop spinning the bolts once a certain torque is reached. Sometimes air impact guns are used and have the air pressure adjusted to stop gun at torque desired using a Skidmore to verify they are exceeding the design tension of the fastener(s). This tool would be considered the Calibrated Wrench. This is an acceptable method, provided they do not change any conditions. They should run the Rotation Capacity Test with the equipment to be used. Once they change any part of the setup (add or remove an air hose, add an additional gun or item ran off of air hose supply, change air pressure, etc.), they will need to rerun the Rotation Capacity Test. If the contractor is using the Turn-Of-Nut Method, then they are not required to use a torque wrench on the nuts as well.
- MoDOT/QA: Inspectors will have different checks based upon the type of verification used by the contractor. If the contractor is using Calibrated Wrench (Torque Wrench or Stall Out Gun) to check every bolt, MoDOT will use a torque wrench and will follow the Calibrated Wrench Method.
- If the contractor is using Turn-Of-Nut, MoDOT will follow two steps. We will visually watch the contractor install and snug tighten the fastener assembly, ensuring the plies are in contact after doing so and ensure that they are marking the nut, bolt, and plies correctly. Then watch as they turn the nut (or bolt) to make sure it is generating the correct number of turns. A visual check of all the bolts turned so far can be quickly done to make sure they are marked, and that the marks are turned the correct amount. As a double check, the inspector will also take a torque wrench to check bolt torque on 10% of the bolts. If bolt issues are discovered, more bolts may need to be checked. Even if the contractor did not use a torque wrench to check the bolts, MoDOT inspectors will still use a torque wrench and record findings.
EPG 712.1.5.4.5 Step 5 details the three verification procedures.
712.1.5.4.5 Step 5, Bolt Verification
712.1.5.4.5.1 Calibrated Wrench Method, Sec 712.7.5
The first option listed in the specification book is the Calibrated Wrench Method. This method will use a calibrated wrench to check that the torque delivered to the bolt is the minimum torque needed to induce the needed minimum tension, as shown in Sec 712.7.3. In order to do this, information must be available from the Rotational Capacity Test completed for each lot.
Sec 712.7.5 states that when the calibrated wrench is used, it needs to be set 5-10% over the torque gauge value from Column 4 of the Rotational Capacity Test. Take the maximum Torque Gauge Reading from the Rotational Capacity Test and multiply by 1.05. This new value will be the one set onto the calibrated wrench.
Day-to-Day Verification
Each day the inspector will need to verify the installed bolts are correctly tensioned. Most of the time, MoDOT inspectors will use the contractor's equipment for the verification. The important thing is that the contractor is verifying the calibrated wrench daily. This will mean that the contractor will need to have the Skidmore on site each day to verify that the wrench is generating the correct tension at the torque it is reading. MoDOT inspectors will pick 10% of the bolts to also check bolt torque. The torque value they are checking is the maximum torque gauge reading generated from Step 3 of the Rotation Capacity Test.
712.1.5.4.5.2 Turn-Of-Nut Method, Sec 712.7.6
The second option listed in the specification book is the Turn-Of-Nut Method. This method uses the fact that the nuts must be turned to the rotation specified in Sec 712.7.6 to induce the needed minimum tension, as shown in Sec 712.7.3. In order to do this, verification will be needed from the Rotational Capacity Test completed for each lot.
When the Rotational Capacity Test is run, in Step 3 is to verify the bolt rotation is less than that specified in Sec 712.7.6. Once this is verified, all the bolts can be tightened to the rotation needed and that will confirm that the needed tension has been achieved. This is provided that all the plies are in contact when snug tightened.
Example
On a project you are installing 7/8” diameter bolts that are 4” long. The RoCap test was performed on the bolt assemblies. When the bolts were tensioned during RoCap, they were tensioned to 39,050 lb. From the formula in Sec 1080.2.5.4.6, the maximum torque is to be 712 lb-ft. The bolt was torqued to 701 lb-ft, so it passes the RoCap test. During the test, the inspector also noted that the bolt nut turned 2 flats (or 1/3 of a turn). Sec 712.7.6 Nut Rotation from Snug Tight Condition table says that this bolt is to be turned 1/2 turn for Turn-Of-Nut in the field. Since the bolt achieved the minimum tension in 1/3 turn, we know that the turning it to 1/2 turn will achieve a higher tension value. If the RoCap test shows a higher turn value needed than the Sec 712.7.6 table, then further discussions should be had with the contractor about next steps before any bolts are installed in the field.
Day-to-Day Verification
For the day-to-day verifications, MoDOT inspectors will visually verify that the Turn-Of-Nut Method is completed correctly. They will review marks made by the contractor and make sure that there is a general comfort level with how the contractor is doing the work. In addition to this, MoDOT inspectors will pick 10% of the bolts to also check bolt torque. The torque value they are checking is the maximum torque gauge reading generated from Step 3 of the Rotation Capacity Test.
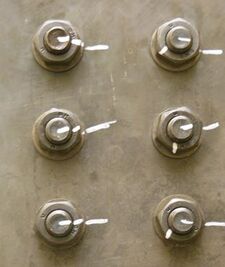
The photograph to the right shows what the markings will look like when the Turn-Of-Nut Method is used. In order to perform the test, three marks are made: one on the nut, one on the bolt, and one on the steel plate underneath. To begin with, mark the nut at a corner, and follow that line all the way through to the steel. Notice the left side bolts are all starting in the same position. The right-side bolts have been rotated 1/3 of a turn, or two flats of the hex head. Notice how the bolt and the steel still line up, and only the nut has moved. Marking the bolt and steel ensures that the bolt does not move during tightening. The nut will show how much it has moved. Marking the hex head accordingly is a semi-permanent record that the test was run. This also provides the inspector with the necessary information to quickly verify tightness, but a random check of 10% of bolts with a torque wrench by the QA inspector shall still occur. The inspector will not have to tighten the bolts themselves but can witness the ironworker who is tightening some of the bolts to ensure they are following the proper procedure of the Turn-Of-Nut Method.
712.1.5.4.5.3 Load Indicating Bolt Method, Sec 712.7.7
The third option listed in the specification book is the Load Indicating Bolt Method. This method uses the fact that the bolts have been specially designed to shear off once a specific torque has been reached in the bolt. This torque has been correlated to the needed minimum tension as shown in Sec 712.7.3. In order to do this, the verification must be available from the Rotational Capacity Test completed for each lot.
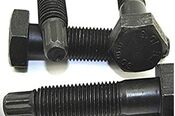
When the Rotational Capacity Test is run, there is one piece of information needed. The Tension Gauge Reading when the spline shears off. Since the spline shears off, and the drill cannot provide any more compactive effort, there is generally not a concern about overtightening the bolt provided that the bolt hardware is clean and well lubricated. Once the bolt shears off, the tension achieved is the final tension. The Rotation Capacity Test will verify that the final tension is at or above the minimum bolt tension required in Sec 712.7.3.
Day-to-Day Verification
Since the machine will shear the bolt off at the specified tension, the biggest piece to verify is done during the Rotational Capacity Test. Once that is done, the inspector just needs to ensure that the contractor is following the correct tightening procedure shown in Sec 712.7.7. Ensure that all plies are in contract when snug tight and that bolt hardware is clean and well lubricated. The QA Inspector should also perform checks of at least 10% of the fastener assemblies with a torque wrench to verify the fastener is tight using the Inspection Torque value (0.95 x highest gauged tension from RoCap Test x bolt diameter in inches / 12). If bolt issues are discovered, more bolts may need to be checked.
712.1.6 High Strength Anchor Bolts
When high strength anchor bolts are specified, ASTM F1554 Grade 55 anchor bolts shall be used unless higher grade anchor bolts are required by design. Grade 105 bolts shall not be used in applications where welding is required. Grade 36 anchor bolts are commonly referred to as “low-carbon” and may be used if specified on the plans. Grade 55 anchor bolts may be substituted for applications where Grade 36 is specified. To facilitate easy identification of anchor bolt, the following figure shows some of the typical bolt markings required by the ASTM specification. The end of the anchor bolt intended to project from the concrete shall be steel die stamped with the grade identification and color coded as follows.
| Grade | Color Code | Identification |
|---|---|---|
| 36 |  |
AB36 XYZ |
| 55 |  |
AB55 XYZ |
| 105 |  |
AB105 XYZ |
Note: XYZ represents the manufacturer’s identification mark.
712.1.7 Non-destructive Testing
In certain instances, non-destructive testing (NDT) may be required to be conducted on steel components of a bridge. The contractor will be responsible for providing and certified NDT technician to conduct the testing. This technician will usually be an employee of a third party inspection agency. Certification for NDT technicians will be in accordance with the requirements of The American Society for Nondestructive Testing (ASNT) Recommended Practice SNT-TC-1A. MoDOT does not maintain an approved list of NDT technicians. The Bridge Division does review certifications for testing agencies and keep a list of personnel of these agencies with their respective certifications.
For projects that require NDT in the field, the inspector will collect the information from the contractor as to who will be providing the NDT services. The inspector will then contact the Bridge Division Fabrication Section to determine if the NDT technician’s certifications have been reviewed. If the certifications have not been reviewed, the contractor shall submit the certifications to the Resident Engineer to be forwarded to the Bridge Division at Fabrication@modot.mo.gov. These certifications shall include, as a minimum, the technicians test scores, work experience, and annual eye exam results.
At the Resident Engineer’s option, they may choose to keep a list of personnel who have performed NDT work for a quick reference for future projects. However, the Resident Engineer and the inspector will always request to see the current eye exam results prior the technician providing the NDT on these future projects.
712.2 Materials Inspection for Sec 712
712.2.1 Scope
This guidance establishes procedures for inspecting and reporting those items specified in Sec 712 that are not always inspected by Bridge Division personnel or are not specifically covered in the Materials details of the Specifications.
712.2.2 Procedure
Normally all materials in Sec 712 will be inspected by Bridge Division personnel. Bolts, nuts and washers accepted by PAL may be delivered directly from the manufacturer to the project without prior inspection. When requested by the Bridge Division or construction office, the Construction and Materials Division will inspect fencing and other miscellaneous items. The Bridge Division is responsible for the inspection of shop coating of structural steel at fabricating plants.
712.2.2.1 Project Inspection and Sampling for PAL
Inspecting of PAL material will be as stated in this section and Pre-Acceptance Lists (PAL).
712.2.3 Miscellaneous Materials
712.2.3.1 High Strength Bolts
All bolts, nuts, and washers should be from a PAL supplier in accordance with Pre-Acceptance Lists (PAL). If a supplier proposes to furnish structural steel connectors and is not on PAL, a request is to be made to the Construction and Material Division for acceptance into the PAL program. Once satisfactory submittals have been received, the supplier will be placed on the PAL. Bolts, nuts, and washers, for use other than bridge construction and in quantities less than 50, may be accepted from a PAL supplier without a PAL identification number.
712.2.3.1.1 Manufacturer's Certification. Bolts and nuts specified to meet the requirements of ASTM A307 shall be accompanied by a manufacturer's certification statement that the bolts and nuts were manufactured to comply with requirements of ASTM A307 and, if required, galvanized to comply with requirements of AASHTO M232 (ASTM A153), Class C or were mechanically galvanized and meet the coating thickness, adherence, and quality requirements of ASTM B695, Class 55. Certification shall be retained by the shipper. A copy should be obtained when sampling at the shipper and submitted with the samples to the lab.
All bolts, nuts and washers are to be identifiable as to type and manufacturer. Bolts, nuts, and washers manufactured to meet ASTM A307 will normally be identified on the packaging since no special markings are required on the item. Dimensions are to be as shown on the plans or as specified.
Weight (mass) of zinc coating, when specified, is to be determined by magnetic gauge in the same manner as described for bolts and nuts in EPG 1040 Guardrail, End Terminals, One-Strand Access Restraint Cable and Three-Strand Guard Cable Material.
Samples for Laboratory testing are only required when requested by the State Construction and Materials Engineer, or when field inspection indicates questionable compliance. Samples shall be taken according to EPG 712.2.3.2.1.1 ASTM A307 Bolts.
712.2.3.1.2 High strength bolts, nuts, and washers specified shall meet the requirements of ASTM F3125 Grade A325. Field inspection shall include examination of the certifications or mill test reports; checking identification markings; and testing for dimensions. The certifications or mill test reports, conforming to EPG 712.2.3.1.1 Manufacturer's Certification, shall be retained in the district office. Samples for Laboratory testing shall be taken and submitted in accordance with EPG 712.2.3.2.1.2 ASTM F3125 Grade A325 Bolts.
712.2.3.2 PAL Manufacturer Facilities Sampling
Prior to visiting a PAL supplier or manufacturer facility, the Cognos report “PAL Shipments Within Date Range” should be run for the facility to determine what material has been given MoDOT PAL numbers. For each PAL material, the sample shall consist of six pieces rather than determined from lot quantities as given in the following sections. An individual sample shall consist of bolts, nuts, or washers as these are treated as different materials in the PAL system.
712.2.3.2.1 Sample sizes
712.2.3.2.1.1 ASTM A307 Bolts
Samples for Laboratory testing are only required when requested by the State Construction and Materials Engineer, or when field inspection indicates questionable compliance. When samples are taken, they are to be taken as shown in the following table. When galvanized bolts, nuts and washers are submitted to the Laboratory, a minimum of 3 samples of each are required for Laboratory testing.
| 3 for lots of 0 to 800 pcs. | Each sample is to consist of one bolt, nut and washer. Submit for dimensions, weight (mass) of coating, mechanical properties. |
| 6 for lots of 801 to 8,000 pcs. | |
| 9 for lots of 8,001 to 22,000 pcs. | |
| 15 for lots of 22,001+ pcs. |
712.2.3.2.1.2 ASTM F3125 Grade A325 Bolts
Samples for Laboratory testing shall be taken and submitted as follows: All lots containing 501 or more, high strength bolts shall be sampled and submitted to the Laboratory for testing. If no lot offered contains 501 or more bolts, sample 10 percent of the lots offered, or one lot, whichever is greater. A lot is defined as all bolts of the same size and length, with the same manufacturer's lot identification, offered for inspection at one time. Samples shall be taken as follows:
| Number of Bolts in the Lot | Number of Bolts Taken for a Sample* |
|---|---|
| 150 and less | 3 |
| 151 through 800 | 3 |
| 801 through 8,000 | 6 |
| 8,001 through 22,000 | 9 |
| 22,001 plus | 15 |
| * A minimum of 3 samples will be required for galvanized materials. | |
All lots containing 501 or more, high strength nuts shall be sampled and submitted to the Laboratory for testing. If no lot offered contains 501 or more nuts, sample 10 percent of the lots offered or one lot, whichever is greater. A lot is defined as all nuts of the same grade, size, style, thread series and class, and surface finish, with the same manufacturer's lot identification, offered for inspection at one time. Samples shall be taken as follows:
| Number of Nuts in the Lot | Number of Nuts Taken for a Sample* |
|---|---|
| 800 and under | 1 |
| 801 through 8,000 | 2 |
| 8,001 through 22,000 | 3 |
| 22,000 and over | 5 |
| * A minimum of 3 samples will be required for galvanized materials. | |
All lots containing 501 or more, high strength washers shall be sampled and submitted to the Laboratory for testing. If no lot offered contains 501 or more washers, sample 10 percent of the lots offered, or one lot, whichever is greater. A lot is defined as all washers of the same type, grade, size and surface finish, with the same manufacturer's lot identification, offered for inspection at one time. Samples shall be taken as follows:
| Number of Washers in the Lot | Number of Washers Taken for a Sample* |
|---|---|
| 800 and under | 1 |
| 801 through 8,000 | 2 |
| 8,001 through 22,000 | 3 |
| 22,000 and over | 5 |
| * A minimum of 3 samples will be required for galvanized materials. | |
712.2.3.2.2 Bolts for Highway Lighting, Traffic Signals or Highway Signing
Bolts, nuts, and washers for highway lighting, traffic signals, or highway signing shall meet the requirements given in EPG 712.2.3.1.2 High Strength Bolts. Samples for Central Laboratory testing are only required when requested by the State Construction and Materials Engineer or when field inspection indicates questionable compliance.
712.2.3.3 Slab Drains
Slab drains are to be accepted on the basis of field inspection of dimensions, weight (mass) of zinc coating, and a satisfactory fabricators certification. The dimensions, weight (mass) of zinc coating, and material specification requirements are shown on the bridge plans.
Field determination of weight (mass) of coating is to be made on each lot of material furnished. The magnetic gauge is to be operated and calibrated in accordance with ASTM E376. At least three members of each size and type offered for inspection are to be selected for testing. A single-spot test is to be comprised of at least five readings of the magnetic gauge taken in a small area and those five readings averaged to obtain a single-spot test result. Three such areas should be tested on each of the members being tested. Test each member in the same manner. Average all single-spot test results from all members to obtain an average coating weight (mass) to be reported. The minimum single-spot test result would be the minimum average obtained on any one member. Material may be accepted or rejected for galvanized coating on the basis of magnetic gauge. If a test result fails to comply with the specifications, that lot should be resampled at double the original sampling rate. If any of the resampled members fail to comply with the specification, that lot is to be rejected. The contractor or supplier is to be given the option of sampling for Laboratory testing, if the magnetic gauge test results are within minus 15 percent of the specified coating weight (mass).
A fabricators certification shall be submitted to the engineer in triplicate stating that "The steel used in the fabrication of the slab drains was manufactured to conform to ASTM A709" or "A500, A501" as the case may be.
712.2.3.4 Miscellaneous Structural Steel
Other structural steel items not requiring shop drawings also require inspection. Inspection includes a fabricator's certification identifying the source and grade of steel, as well as verification of dimensions and inspection of any coating applied. The report is to include the grade of steel, coating applied, and results of inspection.
712.3 Lab Testing
712.3.1 Scope
This establishes procedures for Laboratory testing and reporting samples of structural steel, bolts, nuts, and washers and for welding qualifications.
712.3.2 Procedure
712.3.2.1 Chemical Tests - Bolts, Nuts, and Washers
Weight (mass) of coating shall be determined in accordance with AASHTO M232. Chemical analysis of the base metal shall be determined, when requested, according to Laboratory Testing Guidelines for Sec 1020. Original test data and calculations shall be recorded in Laboratory workbooks.
712.3.2.2 Physical Tests - Bolts and Nuts
Original test results and calculations shall be reported through AASHTOWare Project.
Low carbon steel bolts and nuts shall be tested according to ASTM A307. Tests are to be as follows:
- (a) Bolts shall be tested for dimensions, hardness, and tensile strength.
- (b) Nuts shall be tested for dimensions, hardness, and proof load.
Due to the shape and length of some bolts and the shape of some nuts, it may not be possible or required to determine the tensile strength of the bolts or the proof load of the nuts.
High strength bolts, nuts, and washers shall be tested according to ASTM F3125 Grade A325. Tests are to be as follows:
- (a) Bolts shall be tested for dimensions, markings, hardness, proof load, and tensile strength.
- (b) Nuts shall be tested for dimensions, markings, hardness, and proof load.
- (c) Washers shall be tested for hardness.
Due to the shape and length of some bolts and the size of some nuts, it may not be possible or required to determine the proof load and tensile strength of the bolts or the proof load of the nuts.
712.3.3 Sample Record
The sample record shall be completed in AASHTOWARE Project (AWP), as described in AWP MA Sample Record, General, and shall indicate acceptance, qualified acceptance, or rejection. Appropriate remarks, as described in EPG 106.20 Reporting, are to be included in the report to clarify conditions of acceptance or rejection.
Test results for bolts, nuts and washers shall be reported through AWP.


