751.11 Bearings
751.11.1 General
751.11.1.1 Bearing Types
Elastomeric bearings are economical bearings. Typically the footprint of elastomeric bearings is rectangular or square; however, circular elastomeric bearings may be considered for skewed bridges. See Structural Project Manager before using circular elastomeric bearings. There are three types of elastomeric bearings:+
- Plain fixed – only used at integral end bents
- Laminated fixed
- Laminated expansion
PTFE type bearings shall be used when laminated elastomeric expansion bearings are not capable of handling the required expansion length or the required total thickness of elastomer exceeds 5”.
Multi-Rotational High Load Bearings
Pot bearings can be considered for use on bridges when bearing design service reaction exceeds 300 kips or bearing area exceeds 15” x 24” and effects of curvature are considered. Due to high cost, limited use of these types of bearings are recommended. Consult Structural Project Manager before using Pot Bearings.
The following figure shows an example of what type of bearings should be used at the given locations.

Bearing type location
- Integral construction – Use plain fixed elastomeric bearing or laminated fixed if necessary.
- Flexible intermediate bent (pile cap) – Use laminated fixed bearings for flexible intermediate bents.
- Rigid intermediate bent w/out thermal expansion – Use laminated fixed bearings at bents with no temperature movement.
- Rigid intermediate bent w/ thermal expansion – Use laminated expansion bearings or PTFE/Pot bearings if necessary.
- Rigid end bent w/ thermal expansion - Use laminated expansion bearings or PTFE/Pot bearings if necessary.
751.11.1.2 Limit States and Load Factors
Limit States and Load Factors
In general, each component shall satisfy the following equation:
Where:
| = Total factored force effect | |
| = Force effect | |
| = Load modifier | |
| = Load factor | |
| = Resistance factor | |
| = Nominal resistance | |
| = Factored resistance |
Limit States
- The following limit states shall be considered for bearing design:
- STRENGTH – I
- SERVICE – I
- See LRFD Table 3.4.1-1 and LRFD 3.42 for Loads and Load Factors applied to each given limit state.
- Service loads without including dynamic load allowances shall be used for bearing design.
Resistance Factors
- STRENGTH limit states, see LRFD Article 6.5.4.2 and 5.5.4.2
- For all other limit states, = 1.00
751.11.2 Design
751.11.2.1 Elastomeric Bearings
General
Elastomeric Bearing design shall follow AASHTO LRFD “Method A”.
The elastomeric expansion bearings and fixed bearings for steel girders consist of a sole plate and elastomeric bearing pad. Elastomeric bearings at integral end bents and fixed prestressed girders at intermediate bents consist of elastomeric bearing pad without a sole plate.
The sole plates are flat or beveled to match the profile grade of the roadway surface along the centerline of the girder. If the profile grade is equal to or less than 0.01 or the total drop across the bearing is equal to or less than 1/8 inch, then a flat sole plate may be used and if necessary, elastomer thickness increased to address the bearing rotation due to the profile grade. Sole plates are used to anchor girders, ensure uniform distribution of the compressive stress and strain over bearing area and reduce dead load bearing rotations.
At fixed bearings, girder chairs may be considered as an alternate if roadway slope, rotation or bearing pressure is requiring tall or large bearing pads.
The elastomer bearing pad shall be 60 durometer hardness and reinforced with 1/8 inch steel shim plates when laminated pads are required by design.
When rectangular bearings are used, increased rotation bearing capacity can be achieved by orientating the pad with the shorter dimension of the pad parallel with the span of the girder.
Size Limitations
Use the values in the standard bearing pad tables if possible.
Plain Fixed for P/S I-Girder:
W, width of bearing ≤ Bottom flange width – 1.5”
Plain Fixed for steel girders:
Bottom flange width – 2” ≤ W ≤ Bottom flange width
Laminated Fixed for P/S I-Girder:
W = Bottom Flange width – 1.5”
Laminated Expansion Bearing Pads for PS I-Girders and
Laminated Fixed and Expansion Pads for Steel Girders:
9” ≤ W ≤ Bottom flange width + 7”
Stability
The following requirement shall be met for ensuring stability of the bearing pad:
Rectangular Pads
Circular Pads
Temperature Movement
Determining temperature movements for bearings requires the calculation of the thermal origin of the bridge. To accomplish this, the stiffness of each bent must be calculated. Once the thermal origin is established, the total temperature movement for each bearing location can be found by the following equations:
(temperature range)x(distance from thermal origin)(0.65)
Where:
| = maximum shear deformation of the pad | |
| = 1.2 for laminated pads | |
| = 1.0 for PTFE bearings | |
| = coefficient of thermal expansion | |
| = 0.0000065 IN/IN/ºF (steel superstructure) | |
| = 0.000006 IN/IN/ºF (concrete superstructure) | |
| (0.65) | = 65% reduction due to forgiving nature of elastomer (LRFD 14.7.6.3.4) |
| temperature range | = 150ºF (steel superstructure) |
| = 120ºF (concrete superstructure) |
Shear Deformation
Both plain elastomeric and laminated elastomeric shall meet the following criteria for shear deformation.
Where:
= total elastomer thickness, in.
The following table represents the available heights of laminated expansion pads that are required due to the shear deformation criteria. PTFE type bearings shall be used if
| Laminated Expansion Pads | |||||
|---|---|---|---|---|---|
| , in. | Interior layer thickness, in. | Exterior layer thickness, in. | , in. | n | C, in. |
| 1/2 | 1/2 | 1/4 | 1 | 2 | 1 1/4 |
| 3/4 | 1/2 | 1/4 | 1 1/2 | 3 | 1 7/8 |
| 1 | 1/2 | 1/4 | 2 | 4 | 2 1/2 |
| 1 1/4 | 1/2 | 1/4 | 2 1/2 | 5 | 3 1/8 |
| 1 1/2 | 1/2 | 1/4 | 3 | 6 | 3 3/4 |
| 1 3/4 | 1/2 | 1/4 | 3 1/2 | 7 | 4 3/8 |
| 2 | 1/2 | 1/4 | 4 | 8 | 5 |
| 2 1/4 | 1/2 | 1/4 | 4 1/2 | 9 | 5 5/8 |
| 2 1/2 | 1/2 | 1/4 | 5 | 10 | 6 1/4 |
Where:
| C | = total thickness of bearing including steel shims, in. |
| n | = total number of interior layers of elastomer + 1* |
(*)The additional “1” is accounting for the two exterior layers as per LRFD 14.7.5.3.5
Compressive Stress
Service loads without including dynamic load allowance shall be used for design checks.
At intermediate bents with 2 bearing pads per girder line (i.e. PS I-girders), use ½ of the live load reaction for each pad.
Total Load
Plain Elastomeric Pad
Laminated Elastomeric Pad
and
Minimum Dead Load
The 200 psi minimum requirement is intended for preventing the horizontal crawling of the bearing when it is not attached to the top surface. This requirement has been applied to the bearing designs detailed in EPG 751 even though these bearings are detailed with positive attachment to the flange of the girder. Compliance with the requirement is desirable but is not mandatory if it results in a special bearing design or special superstructure treatments.
Where:
| = compressive stress due to total load = | |
| =compressive stress due to maximum dead load = | |
| =compressive stress due to minimum dead load = | |
| G | = shear modulus = 0.130 ksi for compressive stress calculations |
| S | = shape factor for thickest layer of elastomer = |
| S | = shape factor for circular pads = |
| = thickness of the ith elastomer layer, in. |
Rotation
Rotations shall be taken as the maximum possible change in slope between the top and bottom surfaces of the bearing caused by the initial lack of parallelism between the bottom of girder flange and top of bearing and the girder end rotation due to imposed loads and movements. Rotations may be calculated by a straight-line approximation of dead and live load deflections taken at 1/10 or 1/4 points. The following equation must be satisfied to ensure that uplift does not occur under any combination of loads and corresponding rotation:
Rectangular Laminated Elastomeric Pad
Where:
| L | = length of bearing pad in the direction of traffic |
| W | = width of bearing pad in the direction perpendicular to traffic |
| G | = shear modulus = 0.200 ksi for rotation calculations |
| = maximum rotation about the transverse axis due to initial lack of parallelism and total service load, rad | |
| n | = total number of interior layers of elastomer + 1* |
(*) The additional “1” is accounting for the two exterior layers as per LRFD 14.7.5.3.5
Plain elastomeric pads contained within integral concrete diaphragms are not subject to this rotation requirement.
This criteria is intended as an uplift check. If uplift is not possible at the bearing due to integral beam at abutment or diaphragm at interior bent, then this criteria would not be applicable.
Circular Laminated Elastomeric Pad
Where:
D = diameter of pad
Compressive Deflection
Deflections of elastomeric bearings should be limited to ensure that deck joints and seals are not damaged. Also, bearings that are too flexible can produce a small step across a deck joint giving rise to a high impact loading when traffic passes from one girder to the other. The maximum relative deflection across a joint is suggested to be less than 1/8”.
Initial compressive deflection of plain elastomeric or in any layer of steel reinforced elastomeric bearing at the service limit state without impact shall not exceed .
Values for compressive strain can be calculated by using LRFD Figure C14.7.6.3.3-1 for 60 durometer reinforced bearings.
There is a code check for compressive deflection of a single layer but no code check for total compressive deflection.
Taper
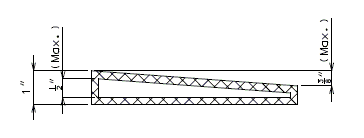
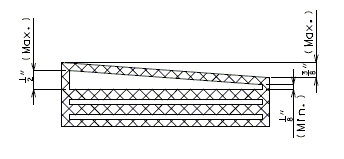
When the difference between the slope of the girder and the slope of a bearing pad exceeds 1/8” taper shall be considered. For laminated expansion pads for both PS I-Girders and steel girders and for laminated fixed pads for steel girders where sole plates are required, sole plates shall be tapered to account for the girder slope. Sole plates shall have a minimum thickness of 1 1/2” at the centerline of bearing, and a minimum thickness of 1” at the edge. Plain fixed pads shall not be tapered. At integral end bents where girder slope is greater than 1/8”, use laminated fixed pads. Laminated bearing taper is provided by tapering the top shim to match the slope of the girder to the nearest 1/8” total difference in thickness. Thickness of shims shall be a minimum of 1/8” and a maximum of 1/2”. For excessive girder slopes it may be necessary to taper the top two shims. Tapered layers of elastomer are not permitted.
Anchor Rods
Check with Structural Project Manager or Liaison before using anchor rods other than ASTM F1554 Grade 55. When anchor rods are used for laminated fixed for steel girders or laminated expansion for steel and P/S I-girders, they should be designed for a minimum horizontal force equal to 20% of the maximum dead load applied to the bearing.
| Maximum Dead Load Reaction, kips (Non-Seismic) | ||||||||||
|---|---|---|---|---|---|---|---|---|---|---|
| 1/4 | 1/2 | 3/4 | 1 | 1 1/4 | 1 1/2 | 1 3/4 | 2 | 2 1/4 | ||
| 1/2 | 1 | 1 1/2 | 2 | 2 1/2 | 3 | 3 1/2 | 4 | 4 1/2 | ||
| Anchor Rod Diameter, in. | ||||||||||
| 1 | 78 | 53 | 41 | 33 | 27 | 23 | 21 | 18 | 16 | |
| 1 1/4 | 153 | 105 | 80 | 64 | 54 | 46 | 41 | 36 | 33 | |
| 1 1/2 | 265 | 182 | 138 | 112 | 94 | 80 | 71 | 63 | 57 | |
| 2 | 628 | 431 | 329 | 265 | 222 | 191 | 168 | 150 | 135 | |
| 2 1/2 | 1227 | 843 | 642 | 519 | 435 | 374 | 329 | 293 | 264 | |
| 3* | 2120 | 1457 | 1110 | 897 | 752 | 647 | 568 | 507 | 457 | |
| 3 1/4* | 2696 | 1853 | 1412 | 1140 | 956 | 823 | 723 | 644 | 581 | |
Note: Calculations were based on 1-1/2" thick sole plate at centerline of bearing and a 2 anchor rod (ASTM F1554 Grade 55) pattern.
(*)Consult Structural Project Manager before using rod diameters larger than 2 1/2".
Use shear blocks if necessary to limit to two anchor rods.
751.11.2.2 Standard Pad Tables for P/S I-Girders
| Bottom Flange Width in. | L in. | W in. | S Int. Layer | S Ext.Layer | DL min kips | DLmax + LL kips | |
| 17 | 9 | 12 | 5.14 | 10.29 | 21.6 | 72.2 | 0.669 |
| 17 | 10 | 14 | 5.83 | 11.67 | 28.0 | 106.2 | 0.758 |
| 17 | 11 | 15.5 | 6.43 | 12.87 | 34.1 | 142.6 | 0.836 |
| 17 | 12 | 15.5 | 6.76 | 13.53 | 37.2 | 163.5 | 0.879 |
| 17 | 13 | 15.5 | 7.07 | 14.14 | 40.3 | 185.2 | 0.919 |
| 17 | 14 | 15.5 | 7.36 | 14.71 | 43.4 | 207.5 | 0.956 |
| 18 | 9 | 12 | 5.14 | 10.29 | 21.6 | 72.2 | 0.669 |
| 18 | 10 | 14 | 5.83 | 11.67 | 28.0 | 106.2 | 0.758 |
| 18 | 11 | 16 | 6.52 | 13.04 | 35.2 | 149.1 | 0.847 |
| 18 | 12 | 16.5 | 6.95 | 13.89 | 39.6 | 178.8 | 0.903 |
| 18 | 13 | 16.5 | 7.27 | 14.54 | 42.9 | 202.8 | 0.945 |
| 18 | 14 | 16.5 | 7.57 | 15.15 | 46.2 | 227.4 | 0.985 |
| 19 | 9 | 13 | 5.32 | 10.64 | 23.4 | 80.9 | 0.691 |
| 19 | 10 | 14 | 5.83 | 11.67 | 28.0 | 106.2 | 0.758 |
| 19 | 11 | 16 | 6.52 | 13.04 | 35.2 | 149.1 | 0.847 |
| 19 | 12 | 17.5 | 7.12 | 14.24 | 42.0 | 194.3 | 0.925 |
| 19 | 13 | 17.5 | 7.46 | 14.92 | 45.5 | 220.6 | 0.970 |
| 19 | 14 | 17.5 | 7.78 | 15.56 | 49.0 | 245.0 | 1.000 |
| 24 | 12 | 18 | 7.20 | 14.40 | 43.2 | 202.2 | 0.936 |
| 24 | 13 | 20 | 7.88 | 15.76 | 52.0 | 260.0 | 1.000 |
| 24 | 14 | 22 | 8.56 | 17.11 | 61.6 | 308.0 | 1.000 |
| 24 | 15 | 22.5 | 9.00 | 18.00 | 67.5 | 337.5 | 1.000 |
| 24 | 16 | 22.5 | 9.35 | 18.70 | 72.0 | 360.0 | 1.000 |
| 24 | 17 | 22.5 | 9.68 | 19.37 | 76.5 | 382.5 | 1.000 |
| 24 | 18 | 22.5 | 10.00 | 20.00 | 81.0 | 405.0 | 1.000 |
Note:
Pads shown in table must be checked for:
Shear deformation, Stability, Rotation, and Compressive deflection.
| Bottom Flange Width in. | L in. | W in. | S Ext.Layer | DL min kips | DLmax + LL kips | |
| 17 | 8 | 15.5 | 10.55 | 24.8 | 124.0 | 1.000 |
| 17 | 9 | 15.5 | 11.39 | 27.9 | 139.5 | 1.000 |
| 17 | 10 | 15.5 | 12.16 | 31.0 | 155.0 | 1.000 |
| 17 | 11 | 15.5 | 12.87 | 34.1 | 170.5 | 1.000 |
| 17 | 12 | 15.5 | 13.53 | 37.2 | 186.0 | 1.000 |
| 17 | 13 | 15.5 | 14.14 | 40.3 | 201.5 | 1.000 |
| 17 | 14 | 15.5 | 14.71 | 43.4 | 217.0 | 1.000 |
| 18 | 8 | 16.5 | 10.78 | 26.4 | 132.0 | 1.000 |
| 18 | 9 | 16.5 | 11.65 | 29.7 | 148.5 | 1.000 |
| 18 | 10 | 16.5 | 12.45 | 33.0 | 165.0 | 1.000 |
| 18 | 11 | 16.5 | 13.20 | 36.3 | 181.5 | 1.000 |
| 18 | 12 | 16.5 | 13.89 | 39.6 | 198.0 | 1.000 |
| 18 | 13 | 16.5 | 14.54 | 42.9 | 214.5 | 1.000 |
| 18 | 14 | 16.5 | 15.15 | 46.2 | 231.0 | 1.000 |
| 19 | 8 | 17.5 | 10.98 | 28.0 | 140.0 | 1.000 |
| 19 | 9 | 17.5 | 11.89 | 31.5 | 157.5 | 1.000 |
| 19 | 10 | 17.5 | 12.73 | 35.0 | 175.0 | 1.000 |
| 19 | 11 | 17.5 | 13.51 | 38.5 | 192.5 | 1.000 |
| 19 | 12 | 17.5 | 14.24 | 42.0 | 210.0 | 1.000 |
| 19 | 13 | 17.5 | 14.92 | 45.5 | 227.5 | 1.000 |
| 19 | 14 | 17.5 | 15.56 | 49.0 | 245.0 | 1.000 |
| 24 | 8 | 22.5 | 11.80 | 36.0 | 180.0 | 1.000 |
| 24 | 9 | 22.5 | 12.86 | 40.5 | 202.5 | 1.000 |
| 24 | 10 | 22.5 | 13.85 | 45.0 | 225.0 | 1.000 |
| 24 | 11 | 22.5 | 14.78 | 49.5 | 247.5 | 1.000 |
| 24 | 12 | 22.5 | 15.65 | 54.0 | 270.0 | 1.000 |
| 24 | 13 | 22.5 | 16.48 | 58.5 | 292.5 | 1.000 |
| 24 | 14 | 22.5 | 17.26 | 63.0 | 315.0 | 1.000 |
| 24 | 15 | 22.5 | 18.00 | 67.5 | 337.5 | 1.000 |
Note:
Pads sizes in above tables (not at integral end bents) must be checked for:
Shear deformation, Stability, Rotation, and Compressive deflection.
For pads at integral end bents:
Shear deformation and Rotation need not be checked.
For fixed bearings requiring more than two layers of 1/4” elastomer separated by 1/8” shim, use shape factor calculated for the interior layer of elastomer in the laminated expansion bearing pad table.
| Bottom Flange Width in. | L in. | W in. | S Single Layer | DL min kips | DLmax + LL kips | |
| 17 | 9 | 12 | 5.14 | 21.6 | 86.4 | 0.800 |
| 17 | 9 | 14 | 5.48 | 25.2 | 100.8 | 0.800 |
| 17 | 9 | 15.5 | 5.69 | 27.9 | 111.6 | 0.800 |
| 17 | 10 | 14 | 5.83 | 28.0 | 112.0 | 0.800 |
| 17 | 10 | 15.5 | 6.08 | 31.0 | 124.0 | 0.800 |
| 17 | 11 | 15.5 | 6.43 | 34.1 | 136.4 | 0.800 |
| 17 | 12 | 15.5 | 6.76 | 37.2 | 148.8 | 0.800 |
| 17 | 13 | 15.5 | 7.07 | 40.3 | 161.2 | 0.800 |
| 17 | 14 | 15.5 | 7.36 | 43.4 | 173.6 | 0.800 |
| 18 | 9 | 12 | 5.14 | 21.6 | 86.4 | 0.800 |
| 18 | 9 | 14 | 5.48 | 25.2 | 100.8 | 0.800 |
| 18 | 9 | 16.5 | 5.82 | 29.7 | 118.8 | 0.800 |
| 18 | 10 | 14 | 5.83 | 28.0 | 112.0 | 0.800 |
| 18 | 10 | 16.5 | 6.23 | 33.0 | 132.0 | 0.800 |
| 18 | 11 | 16 | 6.52 | 35.2 | 140.8 | 0.800 |
| 18 | 11 | 16.5 | 6.60 | 36.3 | 145.2 | 0.800 |
| 18 | 12 | 16.5 | 6.95 | 39.6 | 158.4 | 0.800 |
| 18 | 13 | 16.5 | 7.27 | 42.9 | 171.6 | 0.800 |
| 18 | 14 | 16.5 | 7.57 | 46.2 | 184.8 | 0.800 |
| 19 | 9 | 13 | 5.32 | 23.4 | 93.6 | 0.800 |
| 19 | 9 | 15 | 5.63 | 27.0 | 108.0 | 0.800 |
| 19 | 9 | 17.5 | 5.94 | 31.5 | 126.0 | 0.800 |
| 19 | 10 | 14 | 5.83 | 28.0 | 112.0 | 0.800 |
| 19 | 10 | 16 | 6.15 | 32.0 | 128.0 | 0.800 |
| 19 | 10 | 17.5 | 6.36 | 35.0 | 140.0 | 0.800 |
| 19 | 11 | 17.5 | 6.75 | 38.5 | 154.0 | 0.800 |
| 19 | 12 | 17.5 | 7.12 | 42.0 | 168.0 | 0.800 |
| 19 | 13 | 17.5 | 7.46 | 45.5 | 182.0 | 0.800 |
| 19 | 14 | 17.5 | 7.78 | 49.0 | 196.0 | 0.800 |
| 24 | 12 | 18 | 7.20 | 43.2 | 172.8 | 0.800 |
| 24 | 12 | 20 | 7.50 | 48.0 | 192.0 | 0.800 |
| 24 | 12 | 22.5 | 7.83 | 54.0 | 216.0 | 0.800 |
| 24 | 13 | 20 | 7.88 | 52.0 | 208.0 | 0.800 |
| 24 | 13 | 22.5 | 8.24 | 58.5 | 234.0 | 0.800 |
| 24 | 14 | 22.5 | 8.63 | 63.0 | 252.0 | 0.800 |
| 24 | 15 | 22.5 | 9.00 | 67.5 | 270.0 | 0.800 |
| 24 | 16 | 22.5 | 9.35 | 72.0 | 288.0 | 0.800 |
| 24 | 17 | 22.5 | 9.68 | 76.5 | 306.0 | 0.800 |
| 24 | 18 | 22.5 | 10.00 | 81.0 | 324.0 | 0.800 |
Note:
For integral end bents, use a laminated bearing when taper over 1/8” is required.
751.11.2.3 Standard Pad Tables for Steel Girders
| L in. | W in. | S Single Layer | DL min kips | DLmax + LL kips | |
| 10 | 10 | 5.00 | 20.0 | 80.0 | 0.800 |
| 12 | 10 | 5.45 | 24.0 | 96.0 | 0.800 |
| 14 | 10 | 5.83 | 28.0 | 112.0 | 0.800 |
| 10 | 11 | 5.24 | 22.0 | 88.0 | 0.800 |
| 12 | 11 | 5.74 | 26.4 | 105.6 | 0.800 |
| 14 | 11 | 6.16 | 30.8 | 123.2 | 0.800 |
| 12 | 12 | 6.00 | 28.8 | 115.2 | 0.800 |
| 14 | 12 | 6.46 | 33.6 | 134.4 | 0.800 |
| 16 | 12 | 6.86 | 38.4 | 153.6 | 0.800 |
| 12 | 13 | 6.24 | 31.2 | 124.8 | 0.800 |
| 14 | 13 | 6.74 | 36.4 | 145.6 | 0.800 |
| 16 | 13 | 7.17 | 41.6 | 166.4 | 0.800 |
| 12 | 14 | 6.46 | 33.6 | 134.4 | 0.800 |
| 14 | 14 | 7.00 | 39.2 | 156.8 | 0.800 |
| 16 | 14 | 7.47 | 44.8 | 179.2 | 0.800 |
| 14 | 15 | 7.24 | 42.0 | 168.0 | 0.800 |
| 16 | 15 | 7.74 | 48.0 | 192.0 | 0.800 |
| 18 | 15 | 8.18 | 54.0 | 216.0 | 0.800 |
| 14 | 16 | 7.47 | 44.8 | 179.2 | 0.800 |
| 16 | 16 | 8.00 | 51.2 | 204.8 | 0.800 |
| 18 | 16 | 8.47 | 57.6 | 230.4 | 0.800 |
| 14 | 17 | 7.68 | 47.6 | 190.4 | 0.800 |
| 16 | 17 | 8.24 | 54.4 | 217.6 | 0.800 |
| 18 | 17 | 8.74 | 61.2 | 244.8 | 0.800 |
| 16 | 18 | 8.47 | 57.6 | 230.4 | 0.800 |
| 18 | 18 | 9.00 | 64.8 | 259.2 | 0.800 |
| 20 | 18 | 9.47 | 72.0 | 288.0 | 0.800 |
| 16 | 19 | 8.69 | 60.8 | 243.2 | 0.800 |
| 18 | 19 | 9.24 | 68.4 | 273.6 | 0.800 |
| 20 | 19 | 9.74 | 76.0 | 304.0 | 0.800 |
| 18 | 20 | 9.47 | 72.0 | 288.0 | 0.800 |
| 20 | 20 | 10.00 | 80.0 | 320.0 | 0.800 |
| 22 | 20 | 10.48 | 88.0 | 352.0 | 0.800 |
- Only use plain pads at integral end bents. Do not use sole plate.
- Use girder chairs instead of widening beam.
| B min. | L in. | W in. | S Int. Layer | S Ext. Layer | max in. | max in. | DL min kips | DLmax + LL kips | |
| 9 | 9 | 12 | 5.14 | 10.29 | 3.0 | 1.50 | 21.6 | 72.2 | 0.669 |
| 9 | 10 | 14 | 5.83 | 11.67 | 3.0 | 1.50 | 28.0 | 106.2 | 0.758 |
| 9 | 11 | 16 | 6.52 | 13.04 | 3.5 | 1.75 | 35.2 | 149.1 | 0.847 |
| 11 | 12 | 18 | 7.20 | 14.40 | 4.0 | 2.00 | 43.2 | 202.2 | 0.936 |
| 13 | 13 | 20 | 7.88 | 15.76 | 4.0 | 2.00 | 52.0 | 260.0 | 1.000 |
| 15 | 14 | 22 | 8.56 | 17.11 | 4.5 | 2.25 | 61.6 | 308.0 | 1.000 |
| 17 | 15 | 24 | 9.23 | 18.46 | 5.0 | 2.50 | 72.0 | 360.0 | 1.000 |
| 19 | 16 | 26 | 9.90 | 19.81 | 5.0 | 2.50 | 83.2 | 416.0 | 1.000 |
| 21 | 17 | 28 | 10.58 | 21.16 | 5.0 | 2.50 | 95.2 | 476.0 | 1.000 |
| 23 | 18 | 30 | 11.25 | 22.50 | 5.0 | 2.50 | 108.0 | 540.0 | 1.000 |
| 27 | 20 | 34 | 12.59 | 25.19 | 5.0 | 2.50 | 136.0 | 680.0 | 1.000 |
| 9 | 12 | 9 | 5.14 | 10.29 | 3.0 | 1.50 | 21.6 | 72.2 | 0.669 |
| 9 | 14 | 10 | 5.83 | 11.67 | 3.0 | 1.50 | 28.0 | 106.2 | 0.758 |
| 9 | 16 | 11 | 6.52 | 13.04 | 3.5 | 1.75 | 35.2 | 149.1 | 0.847 |
| 9 | 18 | 12 | 7.20 | 14.40 | 4.0 | 2.00 | 43.2 | 202.2 | 0.936 |
| 9 | 20 | 13 | 7.88 | 15.76 | 4.0 | 2.00 | 52.0 | 260.0 | 1.000 |
| 9 | 22 | 14 | 8.56 | 17.11 | 4.5 | 2.25 | 61.6 | 308.0 | 1.000 |
| 9 | 24 | 15 | 9.23 | 18.46 | 5.0 | 2.50 | 72.0 | 360.0 | 1.000 |
| 9 | 26 | 16 | 9.90 | 19.81 | 5.0 | 2.50 | 83.2 | 416.0 | 1.000 |
| 10 | 28 | 17 | 10.58 | 21.16 | 5.0 | 2.50 | 95.2 | 476.0 | 1.000 |
| 11 | 30 | 18 | 11.25 | 22.50 | 5.0 | 2.50 | 108.0 | 540.0 | 1.000 |
| 13 | 34 | 20 | 12.59 | 25.19 | 5.0 | 2.50 | 136.0 | 680.0 | 1.000 |
Where:
| B min | = minimum allowable bottom flange width |
| max | = maximum allowable total thickness of elastomer |
| max | = maximum allowable shear deformation |
| DL min | = DC |
| DL max | = DC + DW |
751.11.2.4 PTFE (Polytetraflouroethylene) Bearings
General
PTFE sliding bearing shall consist of a lower unit and an upper unit as follows:
The lower unit shall be PTFE bonded to a 1/8” stainless steel plate which is vulcanized to a neoprene pad.
The upper unit shall be a 1/8” highly polished stainless steel plate welded to a steel sole plate.
70 Durometer hardness is to be used for sliding bearings.
Design:
Neoprene Elastomeric Pad
| Maximum (DL +LL) Compressive Stress | = 1000 psi |
| Minimum (DL) Compressive Stress | = 200 psi |
751.11.2.5 Multi-Rotational High Load Bearings
General
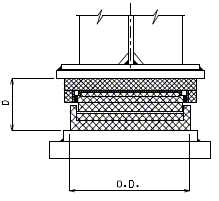
Pot and Disc bearings are the most commonly used multi-rotational bearings. Pot bearings carry vertical loads by compression of an elastomeric disc confined in a steel cylinder and accommodates rotation by deformation of the disc. Disc bearings accommodate vertical loads and rotation through the deformation of an unconfined or partially confined single elastomeric disc that is molded from a urethane compound.
Pot and disc bearings are commonly available in three different types:
1)Fixed – movement is not allowed and horizontal forces can be resisted from any direction.
2)Guided Expansion – allows for free movement in one direction. Horizontal forces can be resisted perpendicular to the free movement direction. For curved bridges, assume the free movement direction to be along a chord connecting the ends of the beam.
3)Expansion – unguided movement is allowed in all horizontal directions. Horizontal forces cannot be resisted.
The following design information shall be shown on the bearing sheets for each bearing location.
- Type (fixed, guided-expansion, expansion)
- Maximum Vertical Design Load
- Minimum Vertical Design Load
- Lateral Design Load (only when exceeding 10% of the Vertical Design Load)
- Total Required Movement
- Minimum Required Rotation
- Slope of girder bottom
- Bottom of girder elevations at centerline of bearing
- Maximum Estimated Bearing Assembly Height
- Location, Size, and Number of anchor bolts
- Length and Width of masonry plate
Include the following note on the appropriate substructure sheets when multi-rotational bearings are used:
- “Any modifications required to meet the height of bearings shown on bridge plans will be the responsibility of the contractor. Cost of any modification required shall be borne by the contractor.”
Inverted pot bearing configurations are not permitted.
Design
Pot or disc bearing design for structures shall follow LRFD 14.7.4 or 14.7.8 respectively.
Maximum and Minimum vertical loads shall be determined at the Service-I limit state. The minimum vertical load should not be less then 20 percent of the maximum vertical design load.
The lateral load provided by the manufacturer may be assumed 10 percent of the total vertical load. If applicable strength or extreme event load combinations result in a load greater than 10 percent, the required load shall be shown on the plans.
The total temperature movement required at a bent may be calculated using the procedure given in this section. Transverse movements should also be considered for large roadway widths. On wide roadways (greater than 40’) an increase in the standard clearance between the guide bar and bearing may be required.
The rotation due to factored loads, , shall be determined from the controlling strength limit state. The minimum rotation required shall include an additional 0.01 radians for fabrication and installation tolerances and uncertainties.
Due to a variety of preferences among multi-rotational bearing fabricators, explicit details are not provided in the plans. Instead, the fabricator determines the sizes of all the bearing components, from the masonry plate to the sole plate. As a guide, the following equation may be used to estimate the height of the assembly for design or the table below.
- H = 6.5 + P/ 400
- Where:
- P = Total load calculated at the service-I limit state (excluding impact), k
- H = Height of the bearing assembly measured from the bottom of the girder to the beam seat elevation, in
When determining the longitudinal load distributed to the substructure for expansion bearings, a friction coefficient of 0.05 shall be used.
Details
Bevel sole plate to match the slope of girder to the nearest 1/8” total difference in thickness across the plate.
When large movements are anticipated at a bearing location, three pairs of bearing stiffeners should be considered to help distribute the load.
Minimum of four anchor bolts are required for the connection of the masonry plate to the substructure.
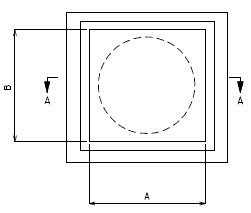
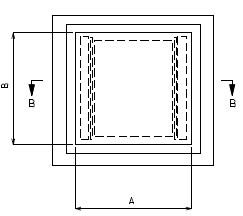
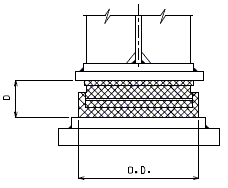
Estimated Pot Bearing Dimensions
The values shown are from one manufacturer and are based on assumed horizontal load requirements (Seismic Performance Category A). The designer should contact manufacturers with specific requirements for their products to get more detailed information on bearing dimensions.
These tables are to be used as a reference to assist the designer in estimating the size of the sole plate and the masonry plate.
| Dimensions for Guided Expansion Bearing | Dimensions for Fixed | |||||||||||
| Total Vertical Load kips | Total Horiz. Load kips | A Inches | B Inches | O.D. Inches | D Inches | Total Vertical Load kips | Total Horiz. Load kips | A Inches | B Inches | O.D. Inches | D Inches | |
| 50 | 10 | 10 | 10.25 | 6.375 | 4.125 | 50 | 10 | 6.5 | 6.5 | 6.375 | 3 | |
| 75 | 14.9 | 11 | 11.25 | 7.25 | 4.25 | 75 | 14.9 | 7.5 | 7.5 | 7.25 | 3 | |
| 100 | 20 | 11.75 | 12.25 | 8.125 | 4.5 | 100 | 20 | 8.25 | 8.25 | 8.125 | 3.25 | |
| 150 | 30 | 14.25 | 13.5 | 10 | 4.875 | 150 | 30 | 9.75 | 9.75 | 10 | 3.375 | |
| 200 | 40 | 15.75 | 14.5 | 11.75 | 5 | 200 | 40 | 10.75 | 10.75 | 11.75 | 3.5 | |
| 250 | 50 | 17.75 | 16 | 12.875 | 5.5 | 250 | 50 | 11.75 | 11.75 | 12.875 | 3.625 | |
| 300 | 60 | 19.25 | 16.25 | 14.25 | 6 | 300 | 60 | 12.75 | 12.75 | 14.25 | 3.625 | |
| 350 | 70 | 20 | 18.25 | 15.875 | 6.375 | 350 | 70 | 13.5 | 13.5 | 15.875 | 4.125 | |
| 400 | 80 | 22.25 | 19 | 17.125 | 6.875 | 400 | 80 | 14.5 | 14.5 | 17.125 | 4.125 | |
| 450 | 90 | 23 | 19 | 18.375 | 7 | 450 | 90 | 15 | 15 | 18.375 | 4.125 | |
| 500 | 100 | 23.75 | 22.75 | 19.375 | 7 | 500 | 100 | 15.75 | 15.75 | 19.375 | 4.25 | |
| 550 | 110 | 24.5 | 22.75 | 19.75 | 7.375 | 550 | 110 | 16.5 | 16.5 | 19.75 | 4.375 | |
| 600 | 120 | 26.5 | 22.75 | 21.375 | 8.25 | 600 | 120 | 17 | 17 | 21.375 | 4.625 | |
| 650 | 130 | 27.25 | 22.75 | 22.625 | 8.25 | 650 | 130 | 17.75 | 17.75 | 22.625 | 4.75 | |
| 700 | 140 | 27.75 | 27.25 | 23.625 | 8.375 | 700 | 140 | 18.25 | 18.25 | 23.625 | 4.75 | |
| 750 | 150 | 28.25 | 27.25 | 24.125 | 8.5 | 750 | 150 | 18.75 | 18.75 | 24.125 | 4.875 | |
| 800 | 160 | 28.25 | 27.25 | 25 | 8.875 | 800 | 160 | 19.5 | 19.5 | 25 | 5 | |
| 850 | 170 | 30.75 | 26.5 | 25.875 | 9.375 | 850 | 170 | 20 | 20 | 25.875 | 5 | |
| 900 | 180 | 31.5 | 26.5 | 26.75 | 9.375 | 900 | 180 | 20.5 | 20.5 | 26.75 | 5 | |
| 950 | 190 | 32 | 31.75 | 26.875 | 9.625 | 950 | 190 | 21 | 21 | 26.875 | 5.375 | |
| 1000 | 200 | 32.25 | 31.75 | 27.5 | 9.75 | 1000 | 200 | 21.5 | 21.5 | 27.5 | 5.375 | |
| 1100 | 220 | 33.5 | 31.75 | 28.875 | 9.875 | 1100 | 220 | 22.25 | 22.25 | 28.875 | 5.5 | |
| 1200 | 240 | 26.75 | 26.5 | 30.75 | 10.375 | 1200 | 240 | 23.25 | 23.25 | 30.75 | 5.625 | |
| 1300 | 260 | 27.875 | 27.5 | 32.25 | 10.625 | 1300 | 260 | 24 | 24 | 32.25 | 5.75 | |
| 1400 | 280 | 28.75 | 28.25 | 32.625 | 11.125 | 1400 | 280 | 25 | 25 | 32.625 | 6.125 | |
| 1500 | 300 | 29.625 | 29 | 33.5 | 11.5 | 1500 | 300 | 25.75 | 25.75 | 33.5 | 6.125 | |
| 1600 | 320 | 30.5 | 29.75 | 34.75 | 11.75 | 1600 | 320 | 26.5 | 26.5 | 34.75 | 6.25 | |
| 1700 | 340 | 31.5 | 30.5 | 35.75 | 12 | 1700 | 340 | 27.25 | 27.25 | 35.75 | 6.375 | |
| 1800 | 360 | 32.5 | 31.5 | 37 | 12.25 | 1800 | 360 | 28 | 28 | 37 | 6.5 | |
| 1900 | 380 | 33 | 33.125 | 37.375 | 12.5 | 1900 | 380 | 28.5 | 28.5 | 37.375 | 6.75 | |
| 2000 | 400 | 33.75 | 35.125 | 38.125 | 12.5 | 2000 | 400 | 29.25 | 29.25 | 38.125 | 6.875 | |
| 2100 | 420 | 34.25 | 38.125 | 39.125 | 12.375 | 2100 | 420 | 30 | 30 | 39.125 | 6.875 | |
| 2200 | 440 | 35 | 38 | 40.125 | 12.625 | 2200 | 440 | 30.5 | 30.5 | 40.125 | 6.875 | |
| 2300 | 460 | 35.875 | 38.75 | 41.625 | 13.125 | 2300 | 460 | 31.25 | 31.25 | 41.625 | 7.25 | |
| 2400 | 480 | 36.25 | 41.25 | 41.875 | 13.125 | 2400 | 480 | 31.75 | 31.75 | 41.875 | 7.5 | |
| 2500 | 500 | 37.125 | 42 | 42.625 | 13.375 | 2500 | 500 | 32.5 | 32.5 | 42.625 | 7.625 | |
| 2600 | 520 | 37.875 | 42.75 | 43.5 | 13.625 | 2600 | 520 | 33 | 33 | 43.5 | 7.625 | |
| 2700 | 540 | 38.5 | 43.25 | 44.375 | 13.75 | 2700 | 540 | 33.75 | 33.75 | 44.375 | 7.75 | |
| 2800 | 560 | 39.125 | 43.75 | 45.25 | 14 | 2800 | 560 | 34.25 | 34.25 | 45.25 | 7.75 | |
| 2900 | 580 | 40 | 44.5 | 46.25 | 14.125 | 2900 | 580 | 34.75 | 34.75 | 46.25 | 7.875 | |
| 3000 | 600 | 40.5 | 45 | 46.625 | 14.375 | 3000 | 600 | 35.25 | 35.25 | 46.625 | 7.875 | |
| 3100 | 620 | 41.125 | 45.5 | 45.625 | 14.75 | 3100 | 620 | 36 | 36 | 45.625 | 8.25 | |
| 3200 | 640 | 41.75 | 46 | 46.875 | 15.125 | 3200 | 640 | 36.5 | 36.5 | 46.875 | 8.375 | |
| 3300 | 660 | 42.375 | 46.5 | 47.625 | 15.375 | 3300 | 660 | 37 | 37 | 47.625 | 8.5 | |
| 3400 | 680 | 43 | 47 | 48.5 | 15.5 | 3400 | 680 | 37.5 | 37.5 | 48.5 | 8.5 | |
| 3500 | 700 | 43.75 | 47.75 | 49.375 | 15.625 | 3500 | 700 | 38 | 38 | 49.375 | 8.625 | |
 |
| |
| Fixed Bearing | Expansion Bearing | |
 |
| |
| Section A-A | Section B-B | |
| Fixed Bearing | Expansion Bearing |
751.11.3 Details
751.11.3.1 Elastomeric Bearings for P/S I-Girders
Expansion Bearings
Note: The location of anchor rods in relation to the slotted holes in the sole plate shall correspond with the temperature at the time of erection. At 60°F the slotted holes should center on the anchor rods.

| |
| SECTION A-A | SIDE VIEW |
|---|---|

| |
| PART PLAN VIEW | |
Note:
Bevel sole plate to match the slope of girder to the nearest 1/8" total difference in thickness across the plate. Minimum thickness shall be 1 1/2" at centerline bearing and 1" at the edge of bearing. (By design)
For > 2 1/2", use PTFE bearings.
(*) Slot width may be increased on wide roadways to accommodate lateral expansion. See Structural Project Manager.
(**) Designer should verify that minimum dimensions are met or neoprene will melt and flow into hole during manufacturing of bearings.
751.11.3.2 Elastomeric Bearings for Steel Girders
Laminated Expansion Bearings
Note: The location of anchor rods in relation to the slotted holes in the sole plate shall correspond with the temperature at the time of erection. At 60°F the slotted holes should center on the anchor rods.

| |
| SECTION A-A | SIDE VIEW |
|---|---|

| |
| PART PLAN VIEW | |
Note:
Bevel sole plate to match the slope of girder to the nearest 1/8" total difference in thickness across the plate. Minimum thickness shall be 1 1/2" at centerline bearing and 1" at the edge of bearing. (by design)
For > 2 1/2", use PTFE bearings.
(*) Slot width may be increased on wide roadways to accommodate lateral expansion. See Structural Project Manager.
(**) Designer should verify that minimum dimensions are met or neoprene will melt and flow into hole during manufacturing of bearings.
Laminated Fixed Bearing

| |
| SECTION A-A | SIDE VIEW |
|---|---|

| |
| PART PLAN VIEW | |
Note:
Bevel sole plate to match the slope of girder to the nearest 1/8" total difference in thickness across the plate. Minimum thickness shall be 1 1/2" at centerline bearing and 1" at the edge of bearing. (by design)
(*) Slot width may be increased on wide roadways to accommodate lateral expansion. See Structural Project Manager.
(**) Design should verify that minimum dimensions are met or neoprene will melt and flow into hole during manufacturing of bearings.
Sole Plate Clipping Details
(for Steel Structures)
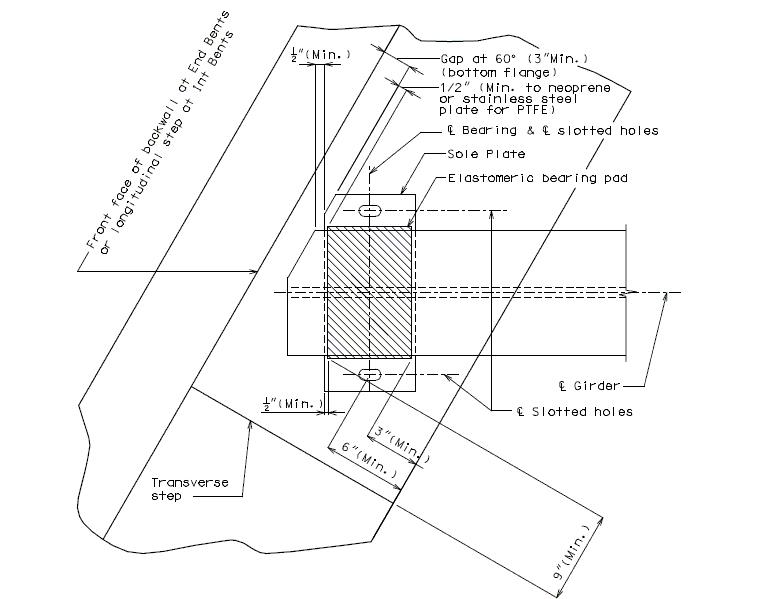 SECTION THRU BEARING
Minimum edge distance shall be maintained on all holes in sole plate. Slotted holes shown are for expansion bearings.
751.11.3.3 PTFE Bearings
Note: The location of anchor rods in relation to the slotted holes in the sole plate shall correspond with the temperature at the time of erection. At 60°F the slotted holes should center on the anchor rods.

| |||
| SECTION A-A | SIDE VIEW | ||
|---|---|---|---|

| |||
| PART PLAN VIEW | |||
(*) Slot width may be increased on wide roadways to accommodate lateral expansion. See Structural Project Manager.
(****) Designer should verify that minimum dimensions are met or neoprene will melt and flow into the hole during manufacturing of bearing.
Details of the sole plate connection to the prestress girder.

SECTION THRU GIRDER
SECTION AT END OF GIRDER
Note:
For PTFE bearing details and notes not shown, see preceding pages.
751.11.3.4 Bearing Edge Distance
Steel or Prestress Girders
Beam Ledges
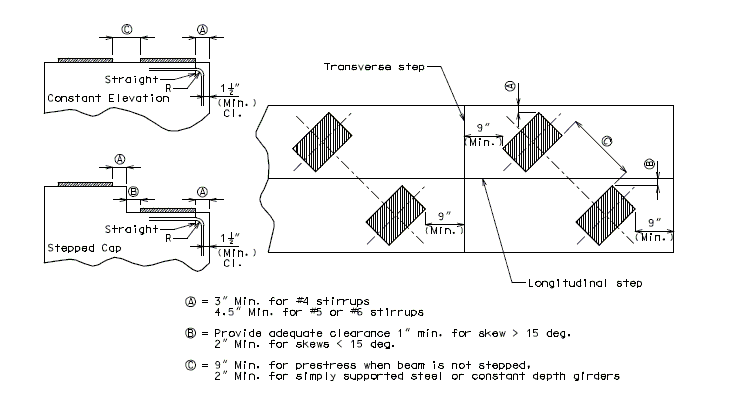
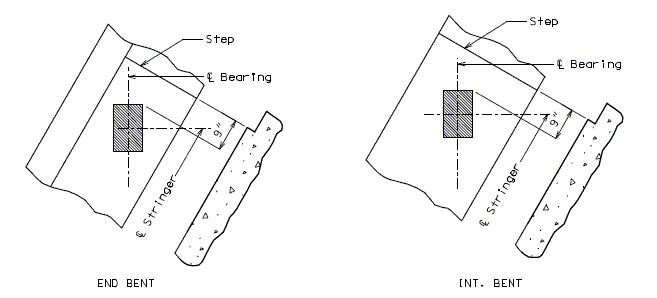
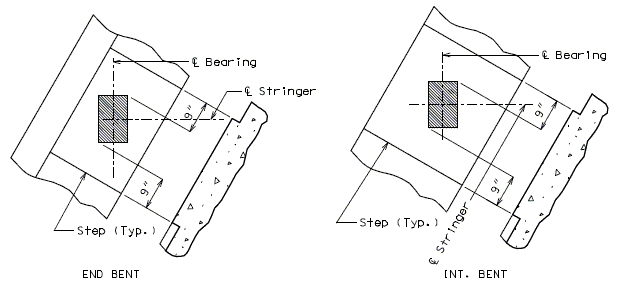
Heavy loads placed near the edge of a concrete surface can produce spalling. Two precautions should be taken to avoid the problem. Additional reinforcement should be placed under the load and around the corner. The bearing area of the load should not project beyond the straight portion of the stirrups, nor beyond the interior face of a transverse anchor bar (if one is provided). The recommended distance to a step, or the end of the bent cap in the transverse direction is 9 inches.
Bearing Clearance
When beams are placed to end at an intermediate bent, the clearance is governed by the bent up strands, diaphragm reinforcement, skew, and any vertical or horizontal curvature in the profile grade. A 9 inch minimum between bearing pads for prestress is a general rule. For simply supported steel or constant depth girders the recommended minimum clearance is 2 inches between bearing pads. See Dimension "C". Also consider transverse girder offsets when using prestress girders on horizontally curved alignments.
Check that all anchor rods are located inside stirrup reinforcement.
Beam Steps
| DEFERENCE IN BEARING ELEV. | METHOD OF OBTAINING ELEVATION |
| 1/8" or less | Retain in vertical dimension but use no fill plates
Use the lower 1/8" for bent height. |
| 1/4" thru 1/2" | Increase thickness of top plate of bearing or haunch. |
| 5/8" thru 1" and up (*) | Monolithic bearing pad or step beam. |
(*) Use same method of obtaining elevaton throughout a structure where practical. Do not mix monolithic bearing pads and steps.
STEP BEAM
MONOLITHIC BEARING PADS
751.11.3.5 Anchor Rods
Clearance for reinforcement:

| |||
| SQUARE | SKEWED | ||
|---|---|---|---|
PART PLAN OF BEAM TOPS
(*) Use even number of bars in beam tops for square bridges when possible.
Note: Details shown above are for information only. Place the following note on the plans, preferably with "General Notes."
"All reinforcing bars in the tops of substructure beams or caps shall be spaced to clear anchor rod wells for bearings by at least 1/2"."
| TABLE OF ANCHOR ROD WELLS | ||||||
|---|---|---|---|---|---|---|
| Anchor Rod Diameter | "A" Well Diameter | "B" Well Depth | "C" Spiral Depth | "D" Spiral Diameter | Spiral Bar Length | Bolt Extension into Concrete |
| 1" | 3" | 12" | 9" | 8 1/8" | 15'-1" | 9" |
| 1 1/4" | 4" | 15" | 12" | 9 1/8" | 19’-9" | 12" |
| 1 1/2" | 4" | 18" | 15" | 9 1/8" | 23'-0" | 15" |
| 2" | 4" | 21" | 18" | 9 1/8" | 26'-1" | 18" |
| 2 1/2" | 4" | 28" | 25" | 9 1/8" | 33'-2" | 25" |
Omit spiral on 21" WF if anchor bolt spacing is less than 6"
| TABLE OF ROD WEIGHTS | |||||||
|---|---|---|---|---|---|---|---|
| Description | 1" | 1 1/4" | 1 1/2" | 2" | 2 1/2" | ||
| Unthreaded (#/in.) | ---- | ---- | .5 | .89 | 1.39 | ||
| Threaded (#/in.) | ---- | ---- | .425 | .755 | 1.20 | ||
| Nut (lbs.) | ---- | ---- | 1.31 | 2.99 | 5.64 | ||
| Weight used for entire bearing (#/ft.) | 2.673 | 4.175 | ---- | ---- | ---- | ||
Anchor rod sizes were based on 10% dead load reactions. Check the anchor rods for any centrifugal forces.
Epoxy coat anchor rod wells at bents with expansion devices.
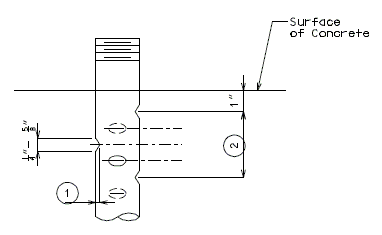 |
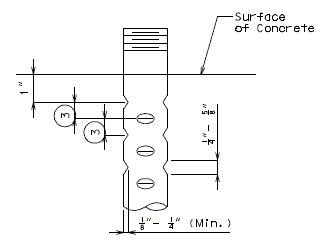
|
| DETAIL "A" | DETAIL "B" |
|---|---|
| (Optional detail for 1 3/8" Ø thru 2 1/2" Ø Anchor Bolts) |
SWEDGE ANCHOR ROD DETAILS

Above detail shall be placed on the bearing sheet of all structures using swedge anchor rods.
751.11.3.6 Girder Chairs
At intermediate bents where prestressed girder sizes change, use girder chairs.
Girder chairs shall also be used at integral end bents if there is girder uplift, or if slope requirements can not be met by laminated bearing pads.
Details shown for P/S I-Girder, Steel Girder or Steel Beam similar.

(*) 3" Minimum when using beam step.
(**) Use beam step if necessary.
| SERVICE LOAD REACTIONS | VERTICAL ANGLE | HORIZONTAL BAR |
| 90 kips | 8 x 6 x 1/2 | 7" x 7/8" |
Use DC Loading (excluding Safety Barrier Curb load) and 50 #/sq. ft. construction load for reactions.
DETAIL A

